Envato MCP Server: A new way to search Envato via your LLM of choice
Envato MCP server connects AI assistants to the Envato library, enabling real-time, structured asset search directly inside tools like ChatGPT, Claude, and Gemini.
Envato: Get every type of asset for any type of project, and access to AI tools. Start now
Learn a complete AI short film workflow, from generation to editing, sound, and cinematic final output.
Creating a short film used to mean cameras, locations, and a lot of setup. Now with Generative AI, you can create entire scenes from a prompt, adjust them in seconds, and build a story visually before you ever hit “record”.
The challenge? AI-generated clips don’t automatically feel like a film. Without structure, they can look disconnected, inconsistent, and hard to edit into something cohesive.
In this tutorial, you’ll learn how to turn raw AI clips into a cinematic sequence using a structured workflow—from generating footage with AI Video Generator to editing and polishing everything in DaVinci Resolve.
An AI short film workflow is a structured process in which you generate video, audio, and visual elements using AI tools, then assemble and refine them in editing software to create a cohesive narrative.
Generate clips with AI Video Generator, create music and sound effects with MusicGen and SoundGen, then edit, sequence, and color grade everything in DaVinci Resolve using Envato LUTs and VFX assets for some cinematic polish.
You’ll build a short cinematic opening scene using AI-generated footage, music, and sound design. By the end, you’ll have a polished sequence you can use for social media, a portfolio, or as the foundation for a longer film.
More importantly, you’ll understand how to structure an AI video workflow — from generating clips to editing and refining them—so you can confidently create your own AI short films from scratch.
You’ll learn how to:
Before jumping into any of the AI video generation tools, let’s take a step back first and start by deciding what you want to make. Remember that a strong short film editing workflow starts with a clear idea
Keep the theme focused. One character, one location, one mood is often enough. For example:
These setups are easier to control because they reduce shot-to-shot variation and help maintain consistency across your generated clips.
Before you begin your AI Video Generator workflow, decide how the film should look. Think about:
These details will directly influence your prompts and help you generate a more cohesive cinematic AI video. Check out our article on filmmaking trends for some inspiration.
One of the biggest shifts in an AI video storytelling approach is thinking beyond individual clips. Instead of generating random shots, map out a short sequence:
For example:
For more control over your prompts, check out this article on exploring advanced AI video prompting techniques.
Once you have a clear concept and visual direction in mind, it’s time to generate your first set of clips using the Envato’s AI video generator.
With your concept in place, the next step in your AI short film workflow is learning how to create AI videos by generating the footage. This is where the AI Video Generator AI video generator comes in. Use Envato AI Video Generator’s presets to help build out shots that match your idea and visual direction.
With Envato AI video tools, a good AI Video Generator workflow begins with clear, focused prompts. If you’re looking for an in-depth guide to this, check out our guide on how to create photorealistic images. Here’s a simple prompt formula plus some prompt examples that you can use:
[Subject] + [Environment] + [Action] + [Lighting] + [Camera movement]
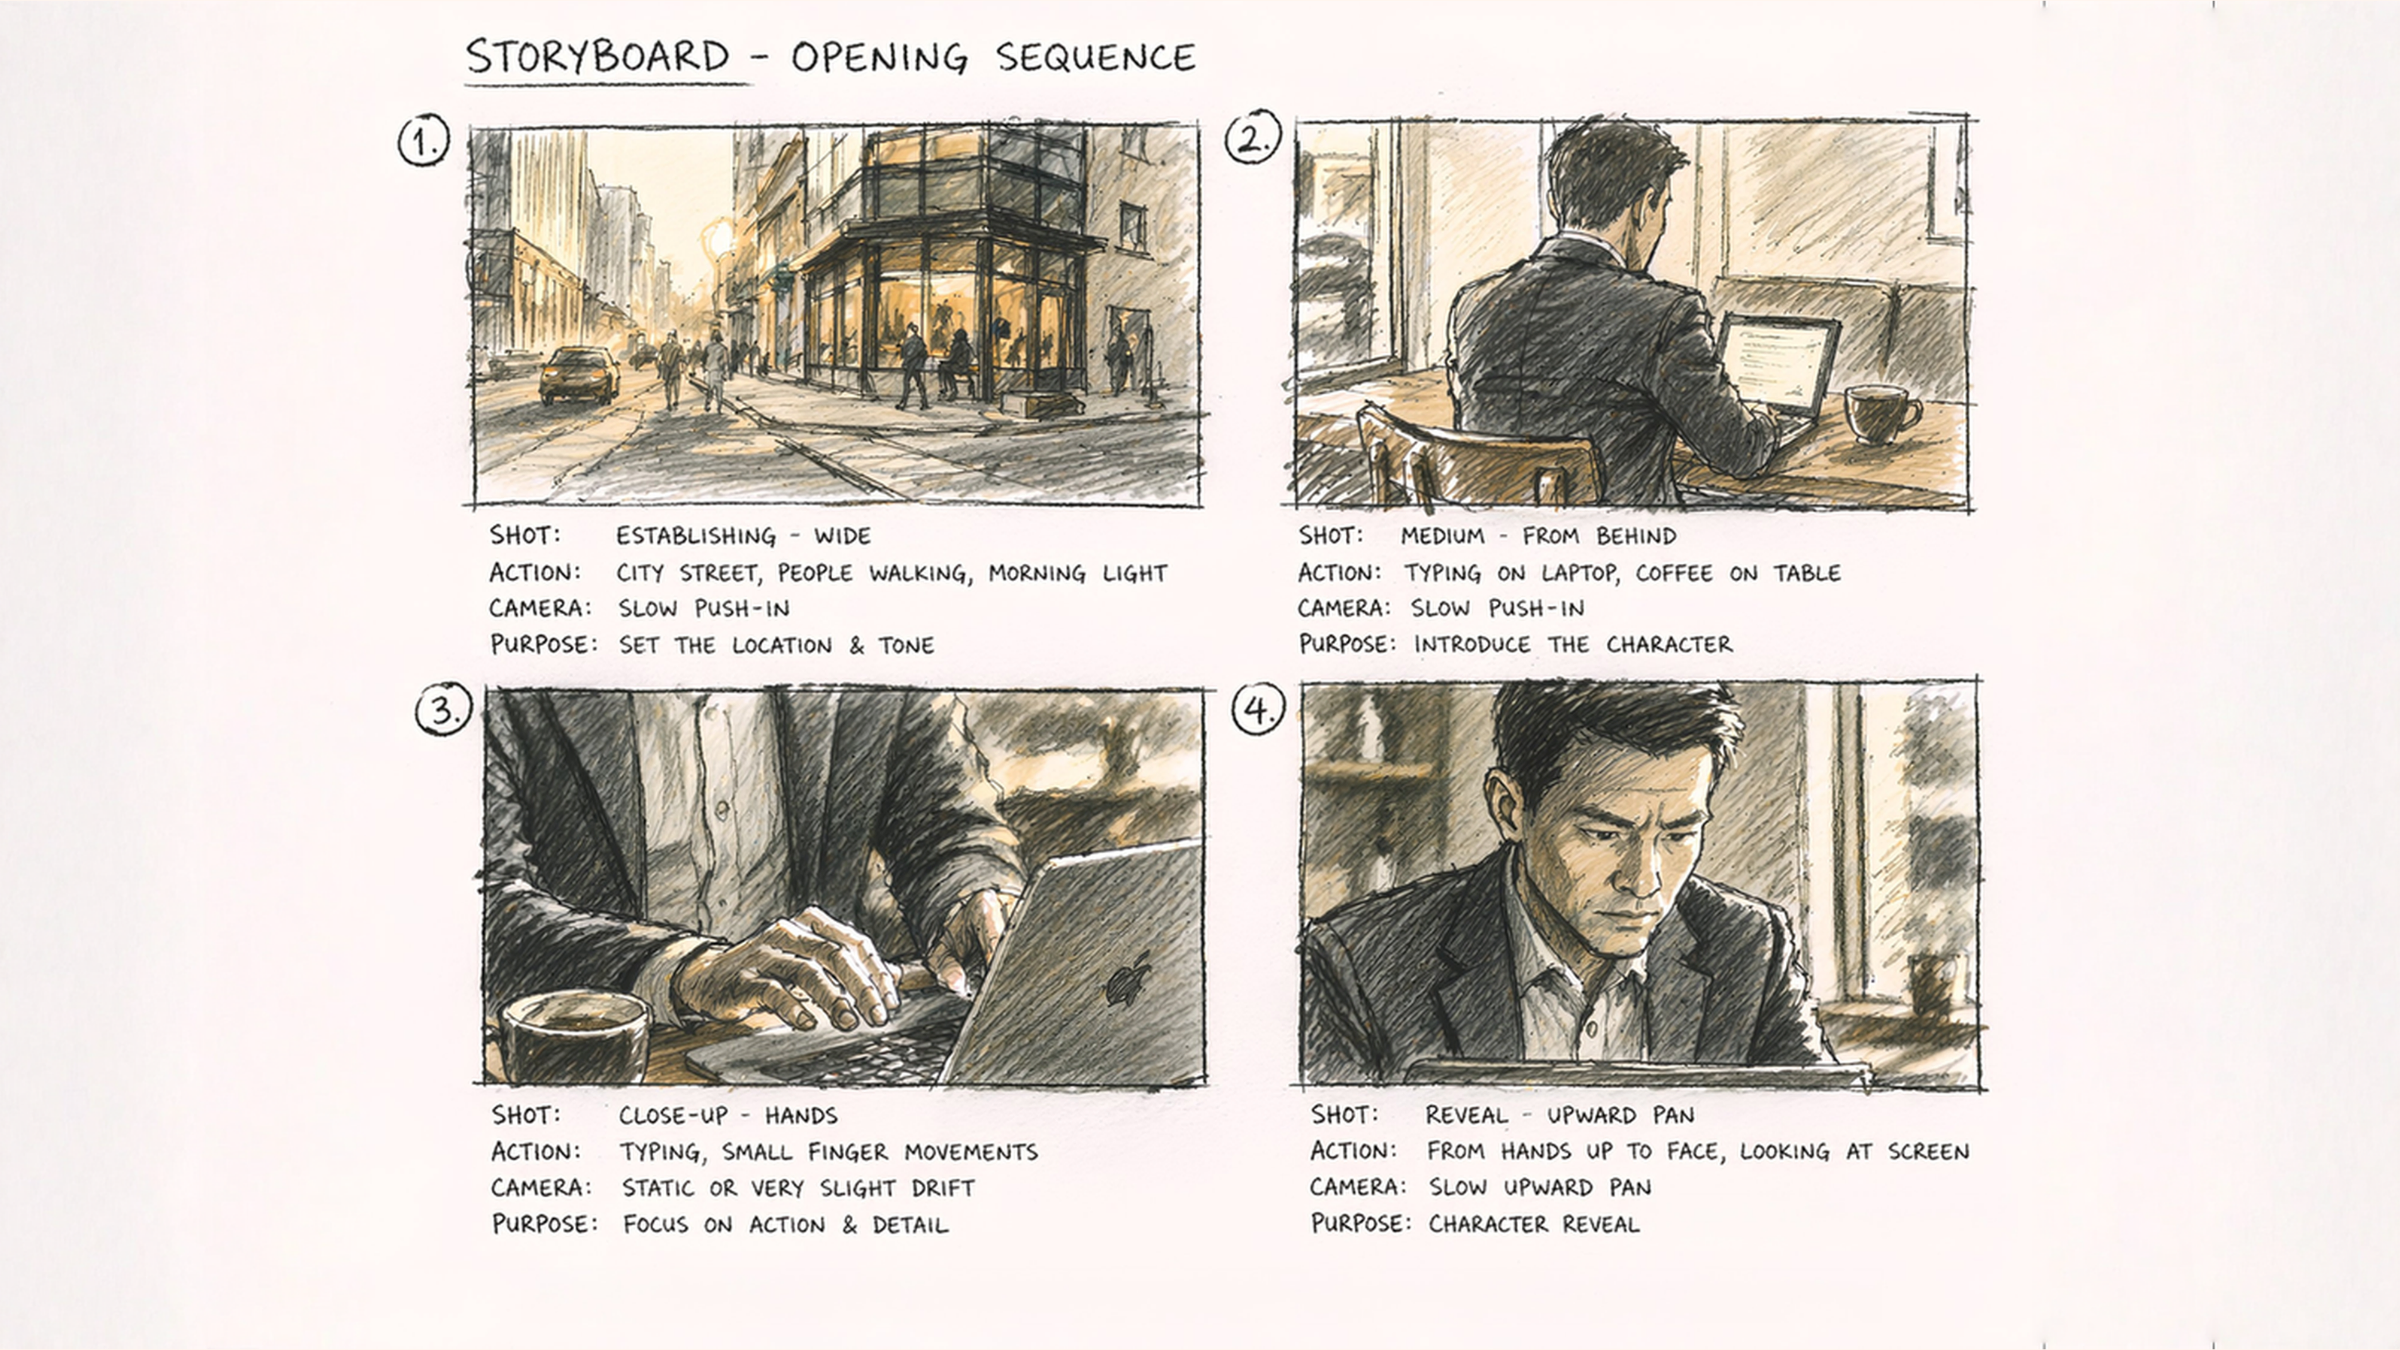
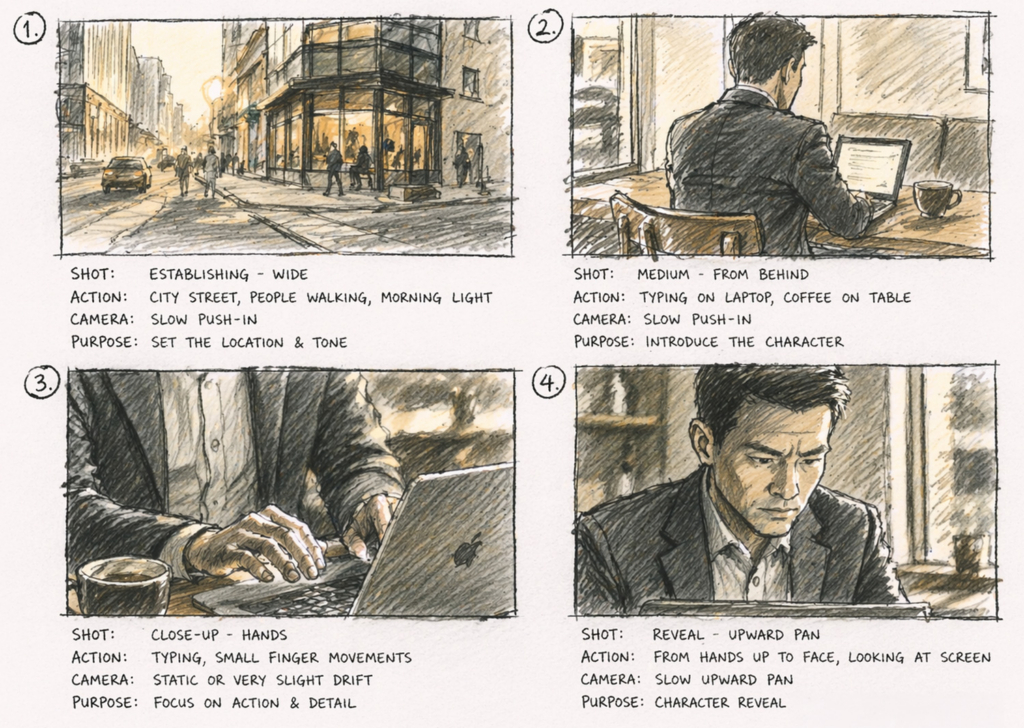
Modern city street with a corner coffee shop + urban city environment at early morning + pedestrians walking past and light traffic moving + soft golden hour sunrise lighting with warm tones + slow cinematic push-in
Professional businessman + cozy coffee shop interior by a window + sitting at a table working on a laptop with a coffee beside him + natural soft window light with warm ambient tones + subtle handheld camera movement
Hands of a businessman with laptop and coffee cup + café table close-up setting + typing on laptop while steam rises from coffee + warm soft ambient lighting with shallow depth of field + slow upward camera pan from hands to face
Repeat this process until all the clips that you need for your sequence is complete.
One output is rarely enough. As part of your AI video pipeline, generate several versions of the same idea:
These variations help you avoid getting stuck with unusable footage and allow for flexibility when building your AI video editing workflow.

Creating an AI video with a consistent character is challenging because AI models don’t truly “remember” identity from one generation to the next. Each clip is produced independently.
So if you’re looking to create a character that you can use for multiple scenes, check out our article on how to keep characters stable across scenes. Combine this with AI Video Generator’s new editing features for the best results. This will come in handy for the next section!
After generating your base clips, you’ll start to see the sequence come together, but it often feels incomplete at this stage.
That’s just part of the AI video production process. You’ll usually notice small gaps where the sequence feels abrupt, unclear, or slightly disconnected. Instead of forcing clips to work, it’s better to generate new ones that support the flow.
Play your clips in order and look for moments where the flow feels off. Common signs include:
These gaps break immersion and make your video feel like a collection of clips rather than a cohesive scene. Instead of forcing clips to work, generate new ones that bridge the gaps. These are often small, detail-focused shots that add continuity and rhythm. Here are some effective options:
| Shot type | Purpose | Example |
|---|---|---|
| Coffee pour | Adds motion and visual interest | Barista pouring coffee in slow motion |
| Latte art | Enhances aesthetic and craft detail | Milk forming latte art in a cup |
| Coffee steam detail | Builds atmosphere and warmth | Steam rising from a hot coffee cup |
| Typing close-up | Reinforces productivity and focus | Hands typing on a laptop keyboard |
| Trackpad movement | Adds subtle interaction and variation | Hand scrolling on a laptop trackpad |
| Drawing tablet | Introduces creative workflow | Hand sketching on a tablet with stylus |
| Window passersby | Adds realism and environmental context | People walking past café window |
| Light rays / atmosphere | Creates cinematic depth and mood | Sunlight streaming through window with dust particles |
| Background café activity | Smooths transitions and fills gaps | Blurred people moving inside café |
AI doesn’t automatically create continuity between clips. You have to build it. By adding supporting shots, you:
With your visuals in place, the next step in your AI short film workflow is building the soundtrack. Music shapes how your sequence comes across. Music isn’t just background. It controls pacing, emotion, and how the audience interprets each moment. The same clip can feel calm, tense, or cinematic depending on the track underneath it.

Open MusicGen AI music generator and describe the type of track you want. Include the basics (e.g. mood and style), and if it helps, mention where and how it will be used. For more details on how to craft a great music prompt, check out our guide on Generating original tracks for your videos with MusicGen. Here’s a quick example of a prompt you can use for MusicGen:
Cinematic ambient track, gentle piano with airy textures, slow tempo, reflective and slightly introspective mood, soft dynamics, morning atmosphere.

Why this works:
If your visuals are quiet and minimal, your music should match that tone.
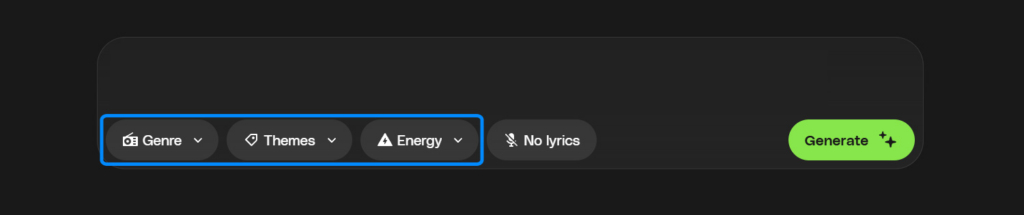
If you need help with shaping your track, use the three controls under the prompt box, which give you a list of options to choose from:
Keep the track fairly minimal. With Envato’s AI music generator, simple arrangements tend to sit better under the visuals, especially once you start adding sound effects.
With your music in place, the next step in your AI short film workflow is adding detail through sound using SoundGen AI sound effects. This is where your sequence begins to feel grounded — footsteps, movement, and background noise, where even subtle sounds make a scene feel alive.
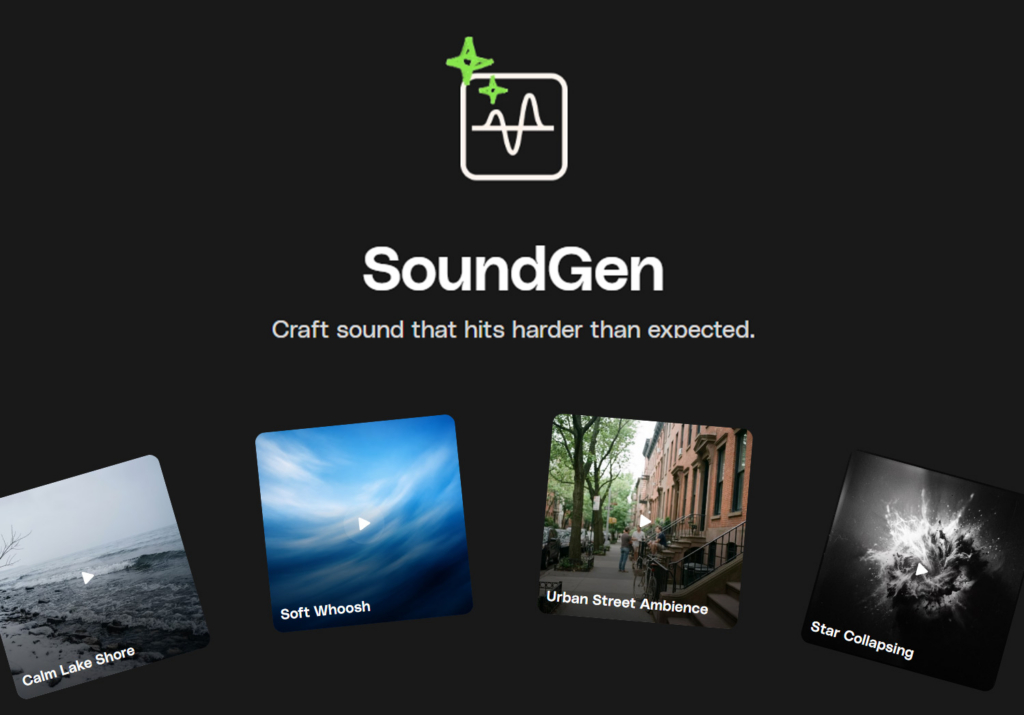
Open SoundGen AI sound effects and focus on the main actions in your sequence. Think about what’s actually happening on screen:
For more on how to use SoundGen, check out our Complete guide to AI sound effect generation, which goes through how to create the best AI sound effects.

With your clips, music, and sound effects ready, it’s time to move into the edit. This is where your AI short film workflow comes together. The goal here is to build a sequence that flows, then refine it.
If you don’t have DaVinci Resolve, you can try some of these tools to help you combine your video clips.
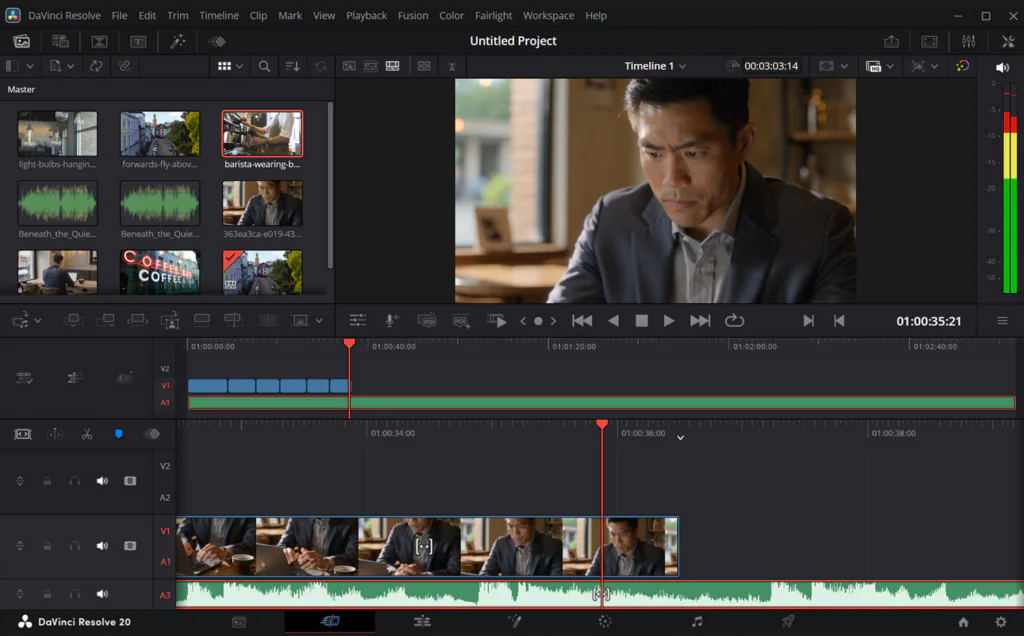
Start by bringing everything into your project:
Arrange everything on your timeline to view the full sequence. Staying organized at this stage really helps your DaVinci Resolve workflow feel much easier to manage.
Focus on structure before detail. Place your clips in order:
Don’t worry about perfect timing yet. This stage of the AI video editing workflow is about creating a sequence that makes visual sense.
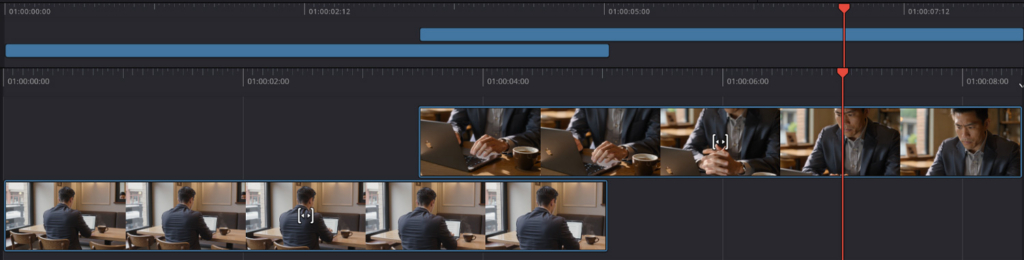
If you’re working with multiple clips, this is also where combining them into a single flow becomes important. You can explore different ways of structuring clips within your sequence as part of your broader AI video pipeline.
Bring in your music track and start matching your clips to it. If you really want to make your sequence flow, you can look for things like:
This is where your short film editing workflow starts to take shape, as visuals and audio begin to work together.
Focus on what’s happening on screen (footsteps, background noise, doors opening and closing etc.). Add your SoundGen clips on top of the timeline and think about things like:

Now go through your timeline again and make small improvements:
This is where your sequence really comes together. Small timing changes can make a big difference in how polished your final video feels.
By this stage, the sequence is working, but the look can still feel slightly uneven from shot to shot. That’s because each AI-generated clip is created independently, often with slight differences in lighting, color, and contrast. Color grading is what brings everything together into a unified look.

Begin by applying a LUT across your clips to establish a consistent tone. It sets a base look across your clips, which helps when they’ve been generated from different prompts. Envato LUTs offer a range of cinematic styles you can work with.
Once a base look is applied, go through your clips and adjust them so they sit well together. Look for things like:
The aim is to reduce any visual jumps between shots so your cinematic AI video feels more cohesive.
After balancing your clips, refine the look with subtle changes:
It doesn’t need to be heavy, just small adjustments to hold up better across a full sequence. After that, just check your sequence as a whole and play it through.
This helps you see how each shot sits within your AI video pipeline, especially during transitions.

At this stage, the sequence is working, and the look is consistent. What’s left is adding a few finishing details so everything sits together more naturally. Check out our article on how to combine your AI video with Envato’s professional collection of templates.
This isn’t about adding heavy effects. It’s about subtle adjustments that help your video feel more grounded and cohesive. However, if your project calls for it, here are a few VFX from Envato that you can use.
Small overlays can help bring the scene to life without drawing attention. For this type of sequence, you might use:
These details sit quietly in the background, helping your cinematic AI video feel more grounded. Here are a few from Envato that you can plug straight into your project.
Now let’s look at the sequence before and after the edit. With an AI filmmaking workflow, the difference comes down to how everything sits together.
The raw clips from the AI Video Generator workflow tend to feel separate. Each shot works on its own, but the sequence can feel uneven, with shifts in pacing, color, and tone. Once you move through the full AI short film workflow, those same clips start to align.
In the final version, the pacing is more consistent, the color holds across shots, and the audio ties everything together. Adding additional shots helps it read as a single piece rather than a set of generated clips, which is where the AI video editing workflow and AI video pipeline make the biggest difference.
And if you want to add that extra bit of professional flavor to your videos, check out Envato’s collection of professional video templates. You can find anything from:
Once the sequence is finished, it’s ready to be exported and shared! The same video can be used in different places, but sometimes it will need to be reframed. So check out our article on how to fit your AI videos to any aspect ratio without regenerating.
Shorter, vertical versions for social, or a full version for YouTube or a portfolio. This final step turns your project from an edit into something you can actually publish and share.
A few small missteps can affect how the final sequence comes together, especially when working through an AI short film workflow.
Keeping these in mind helps your AI video production process stay focused and makes the overall result feel more cohesive.
AI can replace filming for certain projects. Stylised, conceptual, or short-form videos can be created entirely with AI tools, but highly controlled or realistic scenes may still benefit from traditional filming.
Short clips usually work best. In most cases, 2 to 5 seconds is enough to build a sequence, especially when editing for pacing and flow.
Clear, atmospheric styles tend to work best. Scenes with defined lighting, mood, or colour themes—like low light, fog, or strong colour grading—are easier to keep consistent across clips.
Because each clip is generated independently. Differences in prompts, lighting, or camera settings can cause variation, which is why consistency in prompts and colour grading is important.
Congratulations on finishing this AI filmmaking tutorial! This approach keeps things moving. You can go from an idea to something visible quite quickly, then adjust and build on it as the sequence develops.
The process stays flexible throughout. Clips can be swapped, timing can shift, and audio can be adjusted without having to start over. What really matters is how the sequence holds up as a whole. Which means clear shots, consistent visuals, and steady pacing.
If you’re exploring how to make a short film with AI, this kind of AI video pipeline gives you a straightforward way to build and shape a sequence from start to finish.
Envato MCP server connects AI assistants to the Envato library, enabling real-time, structured asset search directly inside tools like ChatGPT, Claude, and Gemini.

Discover what filmmaker Desire Lacap is obsessed with right now, from favourite films and music to creative habits and editing shortcuts.

A good mockup is often the only thing between a scroll-past and a sale. Here's how to use print on demand mockups to present your designs — across t-shirts, posters, mugs, and more — and build credible listings before you've printed a single item.

Learn how to create AI product photography with Envato Shortcuts. Generate commercial-ready product scenes, backgrounds, and concepts in minutes.