


How to edit with AI using Envato stock photos
Learn how to edit with AI on Envato stock photos, customizing images instantly by removing objects, changing backgrounds, and creating polished visuals without leaving the platform.
Envato: Get every type of asset for any type of project, and access to AI tools. Start now
Create characters faster with an AI character design workflow from concept to 3D execution.

Coming up with a character idea can take longer than expected. You sketch a few options, tweak them, start again, and only then think about how it might work in 3D. That early stage often slows everything down. With tools like GraphicsGen, you can move through that phase much faster, which is why the AI character design workflow is becoming more common.
In this guide, we’ll go through a simple AI character design pipeline, starting with GraphicsGen character design and moving on to a practical 2D-to-3D character workflow. Blender is now a force to be reckoned with in the world of 3D and is the tool behind award-winning cinematic experiences, such as the Flow movie.
By the end, you’ll have a way to take a concept from GraphicsGen character design and turn it into something you can build in 3D. This approach works if you’re just getting started with a 2D-to-3D character workflow, or if you’ve been exploring different ways to move from images into 3D using an AI character design workflow. So let’s dive in and be a part of shaping today’s 3D design trends.
TL;DR:
Begin with Envato’s AI graphics generator to sketch out a few character directions. Pick one and simplify it before moving into Blender. When building the model, keep the shapes clear and stylized rather than detailed or realistic.
New to Blender? Don’t worry, we’ve got you covered! Check out our Blender Basics video below that covers everything you need to become a 3D artist.
The first step in any AI character design workflow is generating ideas quickly. Instead of spending time sketching, you can use GraphicsGen character design to produce multiple character directions in minutes. This helps you explore different styles, proportions, and personalities early on, before committing to anything.
When creating AI graphics prompts, think ahead to how the design will work in 3D. This is key if you’re learning how to create 3D characters from AI images. Focus on:
For example, instead of prompting for highly detailed textures or intricate clothing, prioritize shape and structure. This makes the transition from 2D to 3D character design much easier.
At this stage, the goal isn’t to get a “final” design. It’s to build a strong foundation for your AI character design pipeline and set you up for a smoother 2D-to-3D character workflow later on.
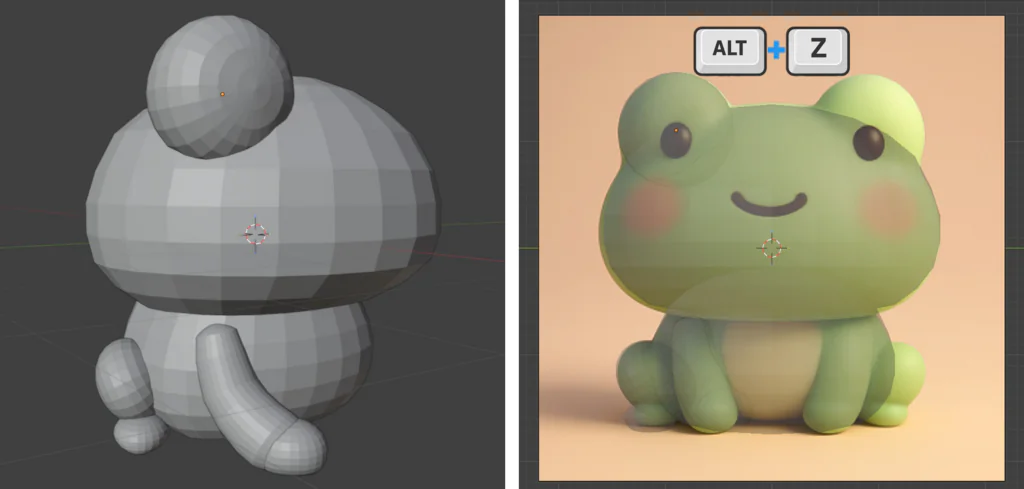
Let’s start by logging in to your Envato account and opening GraphicsGen from your dashboard. Once you’re in, scroll through the available styles and choose Soft 3D Mascots. This style is a good fit for simple, rounded characters that are easier to carry into a 2D-to-3D character workflow later.

Once you’ve selected the style, enter a short prompt that clearly describes your character. For this stage of the AI character design workflow, it helps to keep things simple and visual. For example:
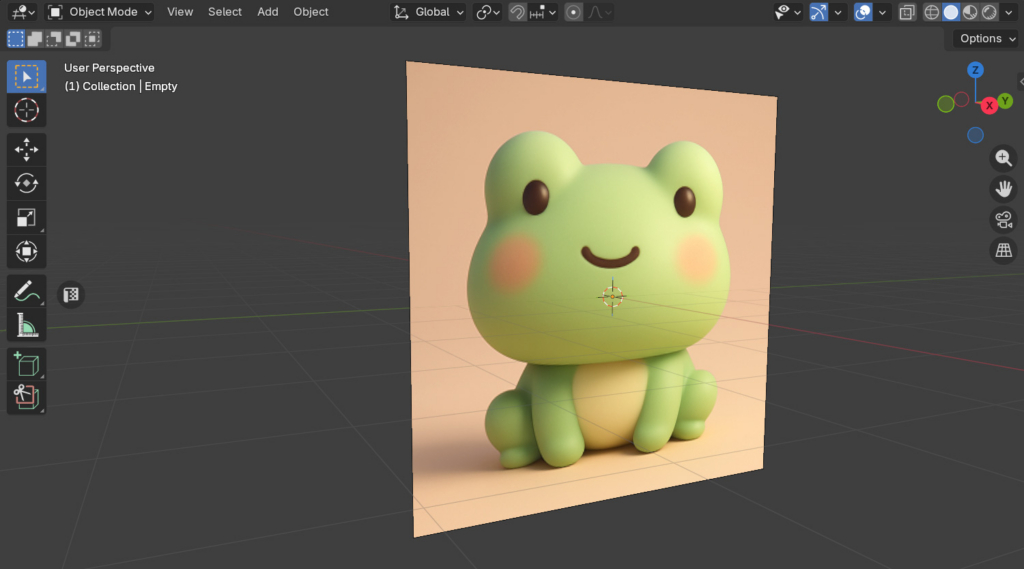
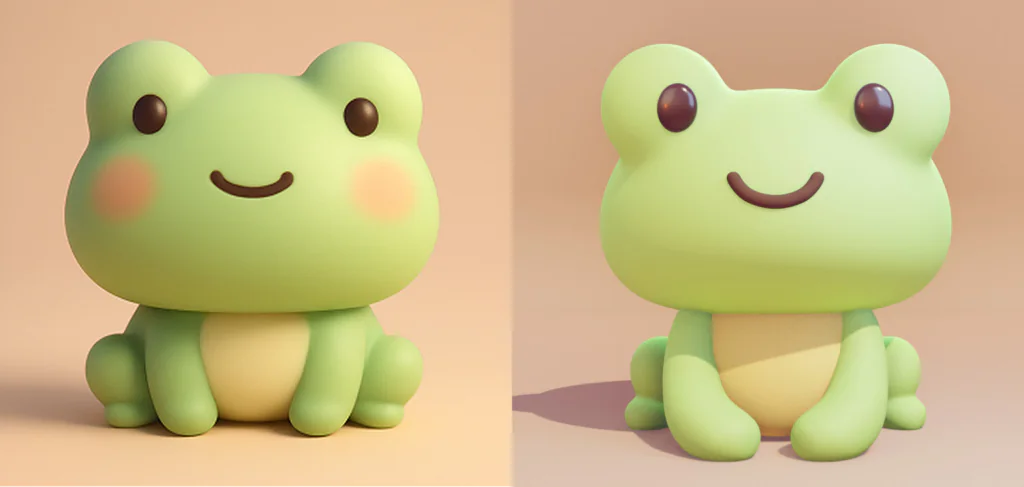
“A cute soft 3D mascot frog with a round body, pastel green skin, small brown eyes, rosy cheeks, a simple smile, and a cream belly, sitting against a warm beige background.”
To learn more about GraphicsGen, check out our complete guide to AI graphics generation.

It helps to try a few different versions of your character idea and review them together. This makes it easier to spot which designs feel clear, balanced, and practical to build.
This step is what makes the AI-to-3D character pipeline effective. You’re selecting a concept that will actually work when you move into modeling. If you’re looking for more inspiration for your 3D character, check out the wide selection of 3D models from Envato, which you can download when you subscribe.

This is where your 2D concept starts to become a real 3D model. In this part of the AI to 3D character pipeline, you’ll take your GraphicsGen design and rebuild it using simple shapes in Blender.
Once you’ve chosen your concept, open Blender and bring your image into the scene as a reference. This helps you stay aligned with your original GraphicsGen character design as you build.
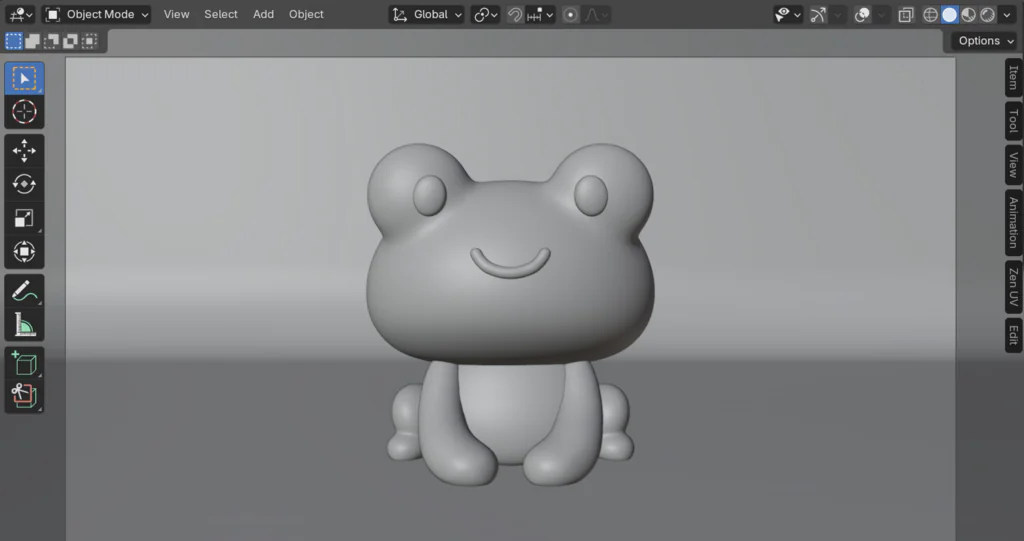
When blocking out a character, begin with the largest forms first. In this stage of the AI character design workflow, you’re creating a rough version of the character using basic geometry. You can also use Toggle X-Ray (Alt – Z) to see through your 3D objects and use the reference image. This approach keeps your 2D-to-3D character design clean and easy to manage.
For a mascot-style design, start with:
If your character is symmetrical, you only need to build one half, then use the symmetry modifier to duplicate it.

With the base shapes set, the next step is to improve how everything fits together. You’ll adjust proportions and clean up the overall look so the character fits together more naturally. This part is vital, especially if you want your character to appear more squishy! Want to know why you want to do this? Check out our article on why squishiness is trending in 3D and motion design.
Work through the model and tweak the forms where needed. You might round out areas, adjust proportions, or shift parts slightly so everything lines up better.

Once the overall shapes feel right, begin adding your character’s main features. Focus on elements that define the look, such as:
Now that your model is in place, you can start adding color and surface detail. This step helps your character feel more finished while still keeping things simple within your 2D-to-3D character workflow.
Begin by assigning simple materials to each part of your model. You don’t need detailed textures at this stage; just flat colors are often enough, especially for stylized characters. Let’s start with:
This approach works well when following an AI character design workflow, as it keeps the look close to your original concept.
By default, materials in Blender can look quite shiny. For softer, stylized characters, you’ll usually want a more matte finish. If you want to dig deeper into texturing in 3D, check out our article on what PBR (Physically-Based Rendering) is in the world of 3D texturing.
To adjust this:
You can also:
This small adjustment makes a big difference when following an AI character design workflow, helping your model feel closer to the original concept.

Here, you’ll add lighting so the character is easy to see. A few lights are enough, along with a sun light to provide an overall direction.
This is your primary light source and defines how the character is lit.

This light reduces harsh shadows created by the key light.
This light helps separate your character from the background, creating a rim of light around the edges.
Soft sunlight adds an overall softness to the lighting and helps balance the scene.

Here, you’ll add a simple background behind the character to complete the look. However, if you’re looking for something a little more complex, check out the links below for some 3D assets you can use to populate your scene.
A simple plane can act as both the ground and background, helping your character stand out more clearly.
This creates a plain backdrop behind your character.

Keep the background clean and minimal so it doesn’t distract from your character.

With your lighting and background in place, the final step is to set up a camera and capture your character. This allows you to frame the shot properly and produce a clean final image.
To view and render your scene, you’ll need to add a camera and position it.

This helps keep the character sharp and the background slightly softer.

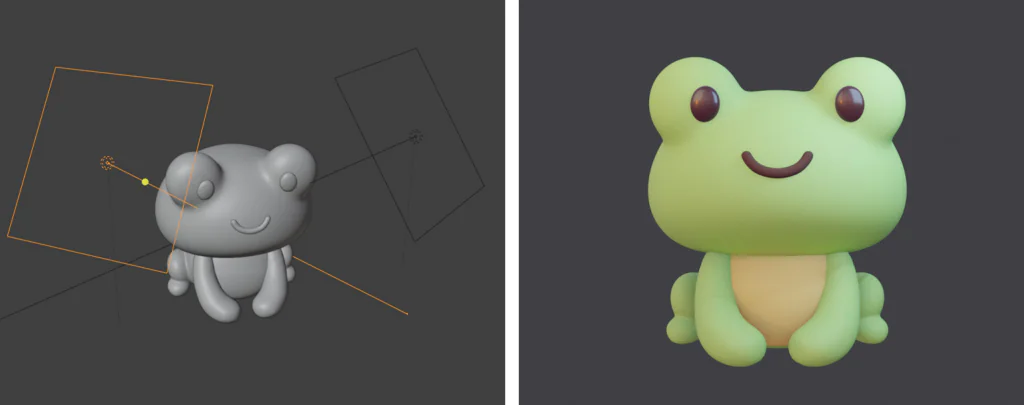
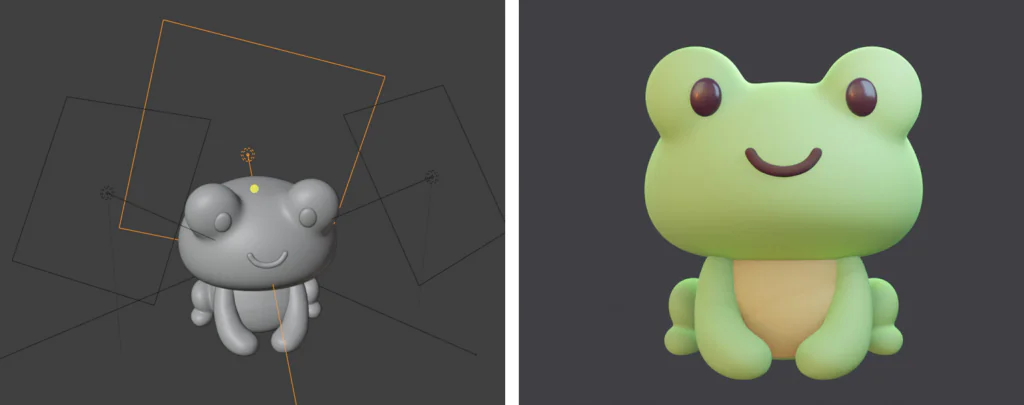
Now let’s look at both these creations side by side to see how the design has been carried into 3D and where small adjustments were needed.
This is your starting point, the original GraphicsGen character design that defines the look and feel of your character. At this stage, the focus is on silhouette, proportions, and core colors rather than technical accuracy. It sets the direction for your AI character design workflow, providing a clear visual reference to guide the rest of your 2D-to-3D character workflow.
This is the version built in Blender using your original concept as a guide. Here, the original concept has been translated into a 3D object, with adjustments made so the character works properly in 3D space. Although some details have been modified (such as the overall form in order to make this character easier to create), you can still tell that it retains the identity of the GraphicsGen concept. If you’re more confident with using Blender, you can, of course, modify the character even further or adjust the objects so that they fall closer in line with the original concept image.
Here are a few common issues to watch for while building your character from a 2D image generated with GraphicsGen into a fully 3D creation in Blender.
So now that you know the 2D-to-3D character workflow, let’s check out a few tips to improve the AI character design pipeline.
With GraphicsGen, an AI character design workflow couldn’t be easier or faster! Using GraphicsGen’s character design AI really speeds up the idea phase, giving you more room to explore different directions and refine your ideas. Then all you have to do is take your image into Blender and use it as a reference to help create your fully 3D version of the character.
This perfect blend of speed and creativity is what makes this AI-to-3D character pipeline so popular. Even if you are new to 3D, the GraphicsGen character design you create at the beginning really helps guide you as you build in 3D space.
From here, the next step is to try it yourself! Create a new character, test different ideas, and see how they translate into 3D using Blender. You can even explore some other AI tools from Envato, or check out the available 3D assets for additional inspiration and to support your AI to 3D character pipeline.
Some online tools will definitely allow you to create 3D models from a 2D image. This has its limitations, however. After the initial generation, the 3D model will need additional work, such as retopology and UV mapping, to be fully usable for applications like games and animation.
You don’t need advanced Blender experience to get started with learning how to create 3D characters from AI images. You just need to learn the basic controls, such as moving, scaling, and adding simple shapes, to follow this AI character design pipeline and build confidence over time.
Simpler designs are easier to work with. Characters built from clear shapes and limited detail tend to translate more cleanly into 3D.
Learn how to edit with AI on Envato stock photos, customizing images instantly by removing objects, changing backgrounds, and creating polished visuals without leaving the platform.

Discover how Envato's AI sound generator creates custom sound effects from text prompts so creators can skip library searches and edit faster.

Learn how AI photo relighting works in Envato Shortcuts. Change lighting, mood, and shadows in seconds with guided AI workflows.

Discover how sonic branding AI tools help you create unique brand sounds, from audio logos to UI effects, and build a consistent, memorable sonic identity across platforms.