Best graphic design software in 2026: 12 tools for every designer
Discover the best graphic design software for every workflow. Compare Photoshop, Illustrator, Figma, Blender, Canva, Affinity, and more to find your ideal tool.
Envato: Get every type of asset for any type of project, and access to AI tools. Start now
Transform AI-generated clips into cinematic 3D scenes using a powerful AI video Blender workflow.

AI-generated video is great for generating ideas quickly, but it can be hard to use when implementing it into a project straight away. That’s where an AI video Blender workflow becomes powerful. You can’t easily change the camera in raw AI footage, you can’t add foreground objects convincingly, and the lighting rarely matches the look you want.
In this tutorial, we’ll solve that by using an AI video Blender technique: bringing the AI clip into Blender as a background plate and building a real 3D scene on top of it. You’ll animate the camera inside Blender, place a few props, match the sun direction, and finish with fog and overlays to tie the shot together.
New to Blender? Don’t worry, we’ve got you covered! Check out our Blender Basics video below that covers everything you need to become a 3D artist.
Before we get started, here’s a quick checklist to make sure you have the following ready.
You’ll want to have a handful of 3D props that fit your scene. In this example, we’ll go for a post-apocalyptic desert inspired by TV shows and games like Fallout. With that in mind, we’ll be downloading 3D models of rusted car frames, worn-out street signs, radioactive waste containers, shrubs, and basic rocks.

Next, we’ll want to have a couple of stock video overlays from Envato to help bring our scene to life. Things like dust storms and a flock of birds are perfect for this. And they also help add depth and scale to the overall composition.

In this AI video Blender tutorial, you’ll move from a simple AI-generated clip to a fully built 3D cinematic shot. We’ll go step by step, importing your plate, setting up the camera, adding props, matching lighting, and finishing with atmosphere and render settings, so you can transform static AI footage into dynamic, controllable, and production-ready content.
Start by generating your base clip in Envato VideoGen. This is the shot you’ll build everything around in your AI video Blender workflow, so it needs to do one job well: give you a solid background for your 3D work later.
If you’re planning to take the footage into Blender, you don’t want an overly “cinematic” AI clip with lots of camera movement. You want something calmer and easier to control, more like a film-set backdrop. The cleaner the plate is, the easier it is to match lighting and drop in 3D props without it looking weird.
Here’s a simple formula you can follow when writing your AI video prompt. Each part controls something important for 3D integration:
setting + focal landmark + atmosphere + lighting + camera behaviour
Before you generate the full animation, do a quick Start Frame Preview first. It’s the fastest way to catch problems early (especially the lighting and overall look) without wasting time rendering the whole clip. Once the plate looks right, you can move on to Blender.
A wide, cinematic shot capturing a vast, sun-drenched landscape under a boundless sky, where wispy clouds drift slowly. Several weathered flags, their fabric gently tattered, billow in the breeze. Along the sunbaked ground, delicate tendrils of dust rise and swirl, carried by the same gentle current. Keep the camera still.
Now it’s time to bring your AI clip into Blender and turn it into a usable backdrop as part of the AI video Blender workflow.
Start in a new Blender scene, then press Shift + A > Image > Mesh Plane. Select your AI video clip and import it.
In the top-right of the viewport, switch to Rendered Preview (or Material Preview if your machine is struggling). The Rendered Preview is the most useful here because it shows how the clip behaves under the lighting in your scene.
You’ll probably notice that objects in the scene can cast shadows onto the video plane. This is normal, but it’s not what we want.
To fix this, we want to jump into the Shading workspace, select the plane, and then add Emission (press Shift + A to search for it). Then plug the Video Texture Color > Emission Color, and then Plug Emission > Material Output (Surface) as shown in the image below:
As soon as you do this, the shadows will stop appearing on it.

Now that the video plate is set up, we’ll set up the camera and its movement. The simplest camera move to begin with is a reveal. Start zoomed in, and then slowly zoom out to reveal the rest of the background image.
This is one of the big wins of using the camera in Blender. You’re not stuck with whatever camera motion the AI decided to generate.
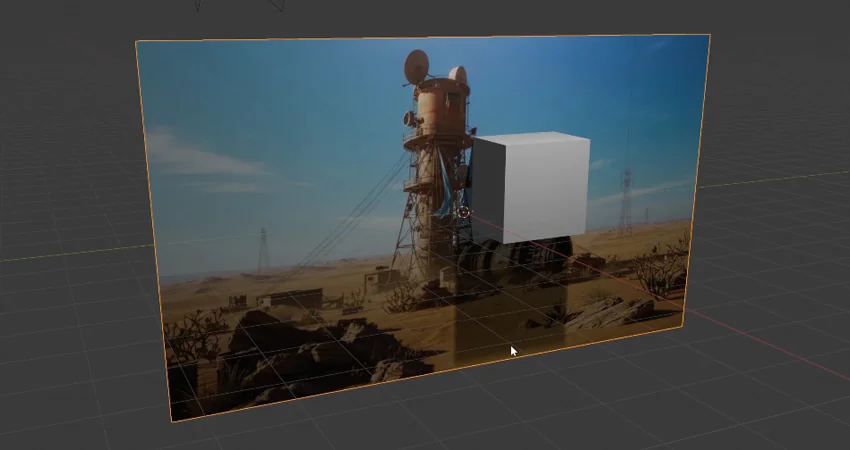
If you don’t already have one in your scene, press Shift + A > Camera. Then press the Numpad 0 key to switch to camera view. Also, make sure to scale the plane up (S) until the clip is large enough to fit the viewport when set to camera view (Numpad 0).
For a reveal shot, the camera works best when it starts close to the video background plate and then slowly moves away to reveal the full image.
With the camera selected, go to the Object Properties and insert a location keyframes for the start of your camera animation and the end of your animation.

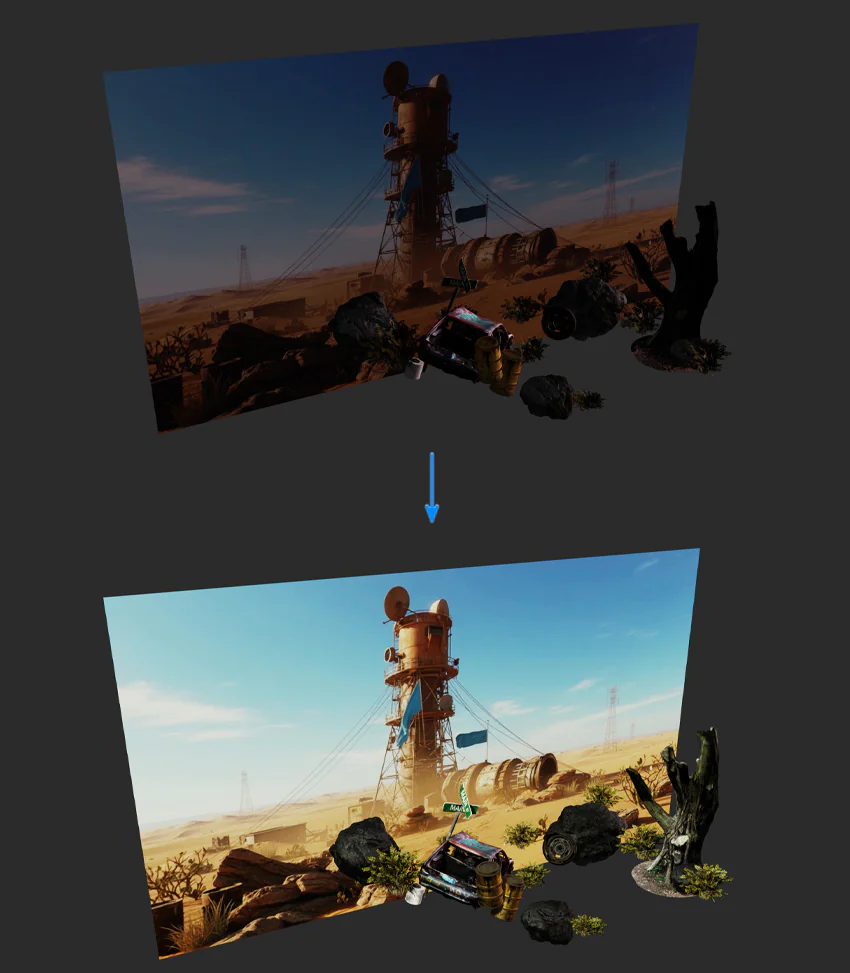
With the camera animation in place, we can start dropping your 3D props into the scene. This part is all about layout. You’re aiming for a simple setup where the camera has something close to move past, a few shapes further back, and enough spacing to add a real sense of moving inside a 3D space.
Start by bringing in your main prop first (File > Import > OBJ/FBX). For this example, we used the wrecked car frame. It’s a good reference for scale, and everything else becomes easier to place once that’s in.
Try to position it so the camera passes close to it during the move. Even a small shift in camera position can create strong parallax when a large object is close to the lens.

Once the hero prop is in, start adding a few secondary objects around it. This is where you can build a simple foreground-to-background stack.
For example:
Try to avoid placing everything on the same “line.” Stagger props at different distances so the camera move has something to reveal as it pushes forward.

As you block things in, keep checking the shot through the camera. You’ll spot problems faster that way.
If the shot starts looking weird, don’t panic. It’s normally one of the boring problems (e.g. the prop is too big, it’s hovering a tiny bit, or the camera angle is fighting the background).
Once your props are in place, the next thing to tackle is lighting. This is the part that usually makes or breaks the illusion. Even if your models are great, they won’t sit in the shot properly unless the light direction matches the AI plate behind them.
Start by adding a basic sunlight (Shift + A > Light > Sun). Rotate it until the light direction matches the video background plate. Use the background shadows as your guide. Find one obvious shadow in the plate and match your Sun light to it.
After the direction is close, tweak the Sun strength until the props sit comfortably against the plate. If they look too dark, they’ll feel pasted on. If they’re too bright, they’ll pop out in a different way.
At this point, your scene should already be working. The plate is in place, the camera move is set, your props are blocked in, and the lighting is roughly matched.
Now you can add the layer that makes everything feel like it belongs together… atmosphere!
The quickest way to add haze in Blender is to wrap the entire scene inside a cube, then turn that cube into a volume.
Once it’s in place, go to the Shading workspace and create a new material for the cube.

With the cube selected:
Then adjust the fog settings:
If the fog starts washing out the scene, the density is too high. Keep it subtle, you want haze, not a smoke machine.

Once the fog is working, you can bring in a couple of video overlays to add motion and depth. These don’t need to be complicated; the point is to break up the stillness. Just like the original animated plate, overlays can be imported as planes. Just import them and scale them to fit the rest of the composition.

With the scene built and the atmosphere in place, the last step is to dial in your render settings so the final output looks as cinematic as possible!
For this workflow, Eevee is ideal. It’s fast, it handles lighting well, and it’s more than good enough for this kind of layered cinematic shot.
In Render Properties:
These settings help your props feel grounded and reduce noisy flicker in fog and shadows.
First, go to Render Properties > Color Management.
From there, you can fine-tune:

When the shot is working in camera view, just render it out as a video file (Render > Render Animation).
If you know you’re going to edit it afterwards, don’t export at the bare minimum. Give yourself a bit of headroom. A slightly higher resolution makes it easier to crop, reframe, or do a quick stabilise pass without the image falling apart.
After the render finishes, bring it into whatever you normally edit with. It doesn’t matter if that’s Premiere, Resolve, After Effects, or something else. At this stage, it behaves like regular footage. Cut it down, add sound, add titles, or keep it as a standalone shot for your portfolio.
Want to dig more into AI video Blender workflows with ready-made 3D props available on Envato? Then check out the video below on how you can build a city scene using KitBash assets.
Yes, but some clips work much better than others. Plates with a wide view, a clear horizon, and steady framing are the easiest to build on. Also, try and avoid videos with fast camera motion, heavy blur, or lots of chaotic movement, as that will limit what you can do with the camera in Blender.
Eevee is usually enough for this type of shot, especially if the goal is speed and iteration. You’re combining a 2D plate with a 3D foreground, so the realism is coming more from composition, lighting match, and atmosphere than from path tracing.
Because the plate is supposed to behave like footage, not a physical object. Emission stops it from reacting to scene lighting and prevents shadows from other objects being cast onto it.
Check and fix these three things first: scale, ground contact, and lighting direction. If those are all good, adding fog, or film grain (even a small amount) usually helps a lot.
Keep it simple! A readable environment, one clear focal landmark, light atmosphere, and obvious lighting direction. Avoid anything too close-up or too busy, because you need space for foreground props.
For this workflow, no. A stable plate is the point. The camera move happens in Blender, where you can control it properly and reuse it.
Discover the best graphic design software for every workflow. Compare Photoshop, Illustrator, Figma, Blender, Canva, Affinity, and more to find your ideal tool.

Learn how to add LUTs in Final Cut Pro, from importing .CUBE files to adjusting intensity and combining with colour correction for better video grading results.

Learn how to use LUTs with RAW footage for accurate colour grading. A step-by-step guide to applying LUTs, preserving dynamic range, and achieving cinematic video results.

Every month, we're rounding up our favourite TikTok trends: the sounds, hooks, and concepts that are going viral right now. We'll break down the formats, show you examples, and give you practical ways to adapt them to your niche.