


Envato: Get every type of asset for any type of project, and access to AI tools. Start now

How to use LUTs with RAW footage: a step-by-step guide

How to use LUTs with RAW footage for better colour grading and cinematic results.

Jonathan Lam 11min read
How to use LUTs with RAW footage

LUTs are a popular way to quickly change the look of your footage, and many editors use LUTs as part of the color grading process. LUTs from Envato can change how color, contrast, and brightness values are displayed in an image without starting from scratch.

However, problems often arise when a LUT is applied directly to RAW or log footage. RAW and log footage can react differently to LUTs than standard video footage. If a creative LUT is applied too early in the workflow, the image may show stronger contrast or color shifts than expected. This is related to how log footage is recorded and processed during editing.

Most creative LUTs are designed for standard HD / Rec. 709 footage rather than unprocessed log footage. Before applying a creative LUT, the footage typically needs to be converted to a standard color space using a technical conversion LUT or a color management workflow.

How to use LUTs with RAW footage (quick steps)

  • Import your RAW footage
  • Adjust exposure and white balance
  • Convert to Rec. 709 or a working color space
  • Apply a technical LUT (if needed)
  • Find and preview your creative LUT on Envato
  • Apply your creative LUT
  • Fine-tune color and contrast

What are LUTs, and how do they work with RAW footage?

LUTs (Look-Up Tables) are color transformations that map one set of colors to another. They’re used to apply a specific look or convert footage between color spaces.

How LUTs are used in video editing

LUTs are commonly used during the color grading stage of post-production. Some LUTs are designed to correct footage, while others are designed to create a specific visual style.

For example, a LUT might:

  • Add warmer tones to skin
  • Create a colder cinematic look
  • Increase contrast and saturation
  • Simulate a film-inspired color grade

LUTs speed up the grading process, but most workflows still require manual adjustments afterward. There are two types to know.

1. Technical LUTs

Technical LUTs are used during color management workflows to transform footage between different image formats or display standards.

They are often used with log recording formats, including Sony S-Log and Canon Log (C-Log). One common use is converting log footage into Rec. 709 for standard viewing and editing workflows.

2. Creative LUTs

Creative LUTs are applied after the main correction process to alter the image’s appearance.

Different creative LUTs can shift color response, contrast, and tonal balance to produce different visual styles. Many downloadable LUT packs, such as those available from Envato, are intended for this stage of the workflow.

Why LUTs don’t work on RAW or log footage

When working with RAW footage, LUTs don’t behave the same way they do with standard video. RAW footage contains unprocessed image data, meaning it hasn’t yet been mapped to a display-ready format.

This is why applying a LUT directly to RAW footage often produces poor results — it skips essential steps in the color workflow.

RAW vs LOG vs LUT: what’s the difference?

Understanding how LUTs interact with RAW footage starts with knowing the difference between RAW, LOG, and LUTs.

  • RAW footage is unprocessed sensor data with maximum dynamic range
  • LOG footage compresses dynamic range into a flat image for grading
  • LUTs transform color values to create a specific look or conversion

Most LUTs are designed for LOG or Rec. 709 footage — not RAW. That’s why conversion is a critical step.

Why you shouldn’t apply LUTs directly to RAW footage

Applying LUTs directly to RAW footage can lead to:

  • Incorrect color mapping
  • Brown highlights
  • Crushed shadows
  • Unnatural contrast

RAW footage needs to be interpreted first. Without this step, the LUT doesn’t “understand” the color data it’s working with.

Instead, treat RAW as your starting point — not your final color space.

RAW and log footage are designed for grading

RAW and log formats are intended to provide more flexibility during editing and color correction. Because of this, the footage normally requires some level of conversion or adjustment before creative grading is applied.

In many editing workflows, footage is first converted to Rec. 709 using either a technical LUT or a color management system. Creative LUTs are then added afterward as part of the final grading process.

Split screen showing a man's face. Left side is labeled 'LOG' and appears desaturated. Right side is labeled 'Rec.709' and appears more vibrant.
A visual comparison of a man’s face, showcasing the difference between a flat ‘LOG’ color profile and a more vibrant ‘Rec.709’ color grade.

Step 1: Convert RAW/log footage to Rec. 709

This is commonly done using technical conversion LUTs or built-in color management tools inside editing software.

What is Rec. 709?

Rec. 709 is a standard color space used for HD video. It is commonly used for web video, streaming platforms, televisions, and most standard editing timelines.

Some cameras record footage using log profiles instead of standard Rec. 709 settings. Many professional and prosumer cameras also offer log profiles or RAW recording, which preserve more image information during capture.

Why is conversion used?

In many editing workflows, log footage is converted into Rec. 709 before creative LUTs are added. This step is commonly handled using a technical conversion LUT or a color management workflow inside the editing software.

After conversion, additional grading and creative adjustments can be applied with greater predictability.

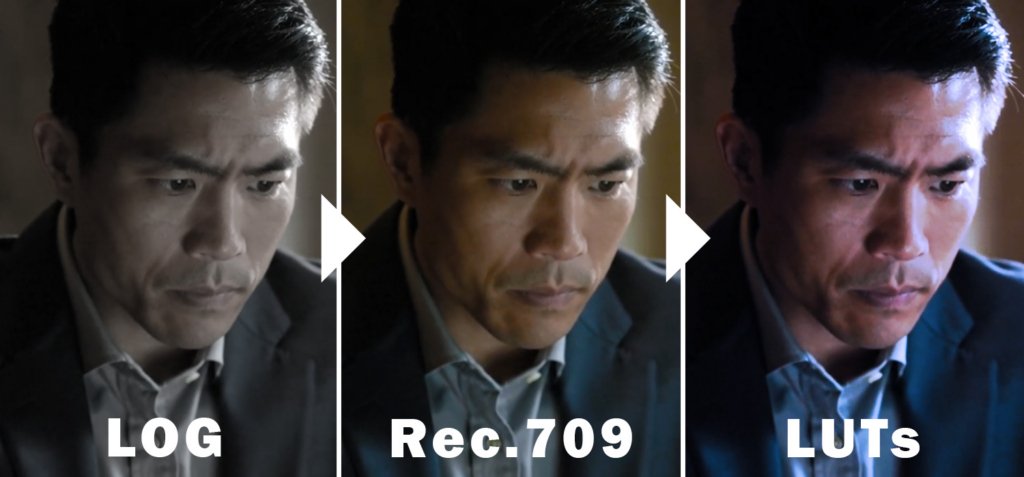
Three side-by-side images of a man, demonstrating the progression of color grading from a flat, desaturated 'LOG' profile, to a standard 'Rec.709' look, and finally to a vibrant, stylized 'LUTs' application.
A visual comparison of color grading stages: from flat LOG footage to standard Rec. 709, and finally to a stylized look achieved with LUTs.

Using technical conversion LUTs

Many camera manufacturers provide technical LUTs designed for their own log formats. These LUTs are used to transform footage into a more standard viewing format during editing.

Common examples include:

  • Sony S-Log3 → Rec.709
  • Canon C-Log → Rec.709
  • Panasonic V-Log → Rec.709
  • Blackmagic Film → Rec.709

These conversion LUTs are different from creative LUTs. Their purpose is to normalize the footage rather than apply a visual style.

Basic conversion workflow

A common workflow looks something like this:

  1. Import the RAW or log footage: Start by importing your footage into your editing software. Footage recorded using log formats will probably appear softer or lower in contrast at this stage.
  2. Apply a technical conversion LUT: Next, apply a technical LUT designed for your camera profile (e.g., Sony S-Log3 to Rec. 709). Some editing software also includes built-in color management tools that perform similar conversions automatically.
  3. Adjust exposure and white balance: After the conversion, image corrections can be applied as needed. This may include exposure balancing, white balance correction, and highlight or shadow refinement.

Step 2: Apply Envato LUTs

Now that your footage is converted to Rec. 709, you’re ready to add a creative LUT.

Finding the right LUT

Envato’s LUT library gives you access to around 66,000 individual LUT assets — each independently searchable, filterable, and previewable before download.

Search by keyword, mood, color characteristics, or technical purpose. Use filters to narrow by the look you’re after — warm, cinematic, high contrast, desaturated — without browsing through packs.

Previewing before you download

Every LUT can be previewed and applied to pre-rendered sample footage directly on the asset page. Use the before/after slider to see exactly what the LUT does to the image.

If you want to see how a LUT will look on your specific footage, upload a frame from your footage. You’ll see the grade applied to your content before committing to a download.

This replaces the old workflow of downloading an entire pack and importing it into your software just to evaluate a single LUT.

Filtering by software

Most LUT packs are compatible with:

Filter by your software to find assets that work in your editing environment.

Applying a creative LUT

Once downloaded, import the LUT into your editing software and apply it using the relevant tool — Lumetri Color in Premiere, a dedicated node in Resolve, or your software’s effect controls. Most packs include basic usage instructions.

Creative LUTs are designed for footage that’s already been corrected and converted. They’re a styling tool — not a correction step.

Step 3: Fine-tune your grade

After an Envato LUT has been applied, you might find that further image adjustments might still be needed, depending on the footage and recording conditions. These changes are often used to balance the image and maintain consistency between clips.

Adjusting the image

Common adjustments during this stage can include:

  • contrast
  • saturation
  • exposure
  • highlights
  • shadows
  • white balance

Reducing LUT intensity

In some workflows, the full LUT effect may appear too strong for the footage. Many editing applications allow the LUT strength or opacity to be adjusted during grading. Reducing intensity can help create a more balanced result while maintaining the grade’s overall look.

Reviewing the final grade

Once the adjustments are complete, it is useful to review clips together within the timeline. Reviewing clips together in the timeline can help highlight variations between shots during the grading process. This stage is often used to make final balancing adjustments across the project.

What’s included in Envato LUT packs

LUT packs vary by artist and style. Most include a range of creative looks designed for HD workflows and color grading, along with basic usage instructions.

Using LUTs within a grading workflow

LUTs can also be used in different ways depending on the editing workflow and the result being created.
For example, LUTs may be:

  • Layered with additional grading adjustments
  • Reduced in intensity
  • Combined with other LUTs
  • Applied differently across individual clips or scenes

In many workflows, LUTs are treated as part of a wider grading process rather than a fixed final result.

Best LUT workflow for RAW footage

A clean workflow typically follows this order:

  1. RAW adjustments
  2. Color space conversion
  3. Technical LUT (if required)
  4. Creative LUT
  5. Manual grading adjustments

This layered approach gives you maximum control and preserves image quality.

5 Common mistakes to avoid

Some grading issues are related to workflow rather than the LUT itself. The following examples are among the more common problems that can occur during editing and color grading.

  • 1. Applying creative LUTs too early. Adding a creative LUT to RAW or log footage before conversion produces inconsistent color and contrast. Always convert first.
  • 2. Skipping basic correction. Exposure and white balance variations between clips become more visible during grading. Correct before you grade.
  • 3. Using LUTs at full intensity. Some LUTs are strong. Reduce intensity or combine with manual adjustments for a more balanced result.
  • 4. Ignoring camera profiles. A LUT designed for Sony S-Log won’t behave the same way on Canon C-Log footage. Match your LUT to your camera profile.
  • 5. Applying the same grade to every shot. Lighting and recording conditions change between clips. Make individual adjustments to maintain visual consistency.

Using LUTs in Premiere Pro and DaVinci Resolve

Premiere Pro

  • Use the Lumetri Color panel
  • Apply LUTs under “Creative” or “Input LUT”
  • Adjust exposure before applying

DaVinci Resolve

  • Use a node-based workflow
  • Apply LUTs in a dedicated node
  • Separate technical and creative adjustments

5 Pro tips for better results

Small workflow adjustments can make LUTs easier to work with during editing and color grading. The following tips are commonly used to improve consistency and maintain more control over the final image.

  • Always start with a balanced image
  • Use LUTs as a guide, not a shortcut
  • Combine LUTs with manual grading
  • Test different looks before committing
  • Keep your workflow consistent

How to use LUTs with RAW footage FAQs

Getting started with Envato LUTs

As you can see, using Envato LUTs is powerful and is an essential part of your video and color grading workflows. They can completely change the appearance of your footage, but the order in which they are applied can affect the final result. In many workflows, RAW or log footage is first processed or converted before creative LUTs are added.

Creative LUTs are typically used during the final styling stage rather than the initial correction stage. For the workflow, a useful way to think of it is to convert first, style second. After the conversion and correction process is complete, creative LUTs can then be added to your project as part of the final grading workflow.

LUT workflows are not limited to video editing either! You can use color grading techniques, similar to those in photography and digital imaging workflows, to adjust the appearance of still images. Check out the video below to learn more.

Related Posts