
Envato: Get every type of asset for any type of project, and access to AI tools. Start now

How to add LUTs in Final Cut Pro: a step-by-step guide

How to add LUTs in Final Cut Pro and apply them correctly for better colour grading.

Jonathan Lam 10min read
How to add LUTs in Final Cut Pro

LUTs are a common part of modern video editing workflows. They’re used to change color, contrast, and overall tone without rebuilding the same grade from scratch every time. In Final Cut Pro, LUTs from Envato can be added directly to clips using the built-in Custom LUT effect.

To add LUTs in Final Cut Pro, you simply apply the Custom LUT effect from the Effects panel, then load your .CUBE file in the Inspector. From there, you can adjust the strength and combine it with other color tools.

One of the main challenges for beginners is figuring out where LUTs are applied inside Final Cut Pro. After downloading a LUT pack, it’s not always obvious which effect to use, or how to control the strength once it’s added to footage.

Below, we’ll go through how to add LUTs in Final Cut Pro from start to finish, including importing a LUT, applying it, adjusting intensity, and using LUTs correctly with log footage.

How to add LUTs in Final Cut Pro (quick steps)

  • Import your footage
  • Open the Effects panel
  • Add the Custom LUT effect
  • Load your .CUBE LUT file
  • Adjust intensity using the Mix slider
  • Refine with color correction tools

What is a LUT in Final Cut Pro?

LUT stands for “Look-Up Table.” It’s a file that remaps color and brightness values to change the appearance of footage. Most editors use LUTs as a fast way to apply a certain look or color style to a clip.

In Final Cut Pro, a LUT works like an extra effect layer added onto a clip. With LUT’s, you don’t have to manually adjust every clip from scratch. Apply the LUT, and the footage will usually look different straight away.

What is a LUT in Final Cut Pro?

LUT stands for “Look-Up Table.” It’s a file that remaps color and brightness values to change the appearance of footage. Most editors use LUTs as a fast way to apply a specific look or color style.

In Final Cut Pro, a LUT works like an effect layer applied to a clip. Instead of adjusting every parameter manually, you can apply a LUT and immediately see a different result.

What are LUTs used for?

LUTs are used to speed up color grading and maintain consistency across footage. They’re commonly used for:

Some LUTs are subtle, while others create a much stronger stylized effect.

Technical LUTs vs creative LUTs

Not all LUTs are designed for the same purpose. When downloading LUT packs, you’ll normally see two common types, which are called “technical LUTs” and “creative LUTs”.

Technical LUTs

Technical LUTs are used for color correction or conversion. For example, converting log footage to Rec. 709 so it looks more natural.

Examples:

  • Sony S-Log3 → Rec.709
  • Canon C-Log → Rec.709
  • Panasonic V-Log → Rec.709
  • Blackmagic Film → Rec.709

Creative LUTs

Creative LUTs are usually chosen based on the type of look you want the footage to have. You can choose Creative LUTs to apply a specific look or style.

Examples:

  • Warm film-style tones
  • Cool cinematic grades
  • Faded vintage looks
  • High-contrast visuals

In most workflows, a technical LUT is applied first, followed by a creative LUT.

Unlimited Creative Assets. Access to AI Tools.

Advanced Cinematic LUTs for Wedding Videographers: 30 Must-Have Presets

aaapresets
Advanced Cinematic LUTs for Wedding Videographers: 30 Must-Have Presets

Traveller LUTs for Final Cut

Playground_Studio
Traveller LUTs for Final Cut

Art Film LUTs

Playground_Studio
Art Film LUTs

Moody Travel LUTs

Playground_Studio
Moody Travel LUTs

Sunset LUTs

Playground_Studio
Sunset LUTs

Film Emulation LUTs for Final Cut

Playground_Studio
Film Emulation LUTs for Final Cut

How to add LUTs in Final Cut Pro (step-by-step)

Once you understand what LUTs actually do, the next step is to apply them in Final Cut Pro. Applying a LUT in Final Cut Pro is fairly straightforward, and the process takes only a few steps.

Step 1: Import your footage

Start by opening your Final Cut Pro project and importing the clips you want to work with.

  1. Open your library or create a new project
  2. Click Import Media
  3. Select your video files
  4. Add the clips to your media browser
  5. Drag a clip onto the timeline

Once the footage has been placed on the timeline, it’s ready for LUTs and color adjustments.

Tip: Footage that is properly exposed usually responds better to LUTs. Clips that are extremely dark or overexposed may produce less predictable results.

A screenshot of a media import window on macOS, showing a video preview of a person standing in water with mountains in the background, alongside a list of video files and import settings.
Importing scenic video footage from China into a macOS video editing application, featuring a person in water with majestic mountains reflecting on the surface.

Step 2: Add the Custom LUT effect

In Final Cut Pro, LUTs are applied using the built-in Custom LUT effect.

  1. Open the Effects browser
  2. Scroll to the Color category
  3. Find Custom LUT
  4. Drag the effect onto your clip in the timeline

After adding the effect, new LUT controls will appear inside the Inspector panel.

Important: Importing a LUT file onto your computer does not automatically make it active on footage. The LUT still needs to be loaded manually through the Custom LUT effect.

Screenshot of a software interface showing a dropdown menu for 'LUT' with 'Choose Custom LUT...' highlighted. An annotation explains this option imports a custom LUT effect.
Import a custom LUT effect by selecting ‘Choose Custom LUT…’ from the dropdown menu in the software interface.

Step 3: Load your Envato LUT

Now it’s time to load the LUT file itself.

  1. Select the clip with the Custom LUT effect applied
  2. Open the Inspector panel
  3. Locate the Custom LUT settings
  4. Open the LUT dropdown menu
  5. Choose Custom LUT…
  6. Select your .CUBE LUT file

Once the file has been loaded, the clip should change appearance immediately.

Tip: Most LUT packs use .CUBE files, which are commonly supported across many editing applications and color grading tools.

Step 4: Adjust LUT intensity

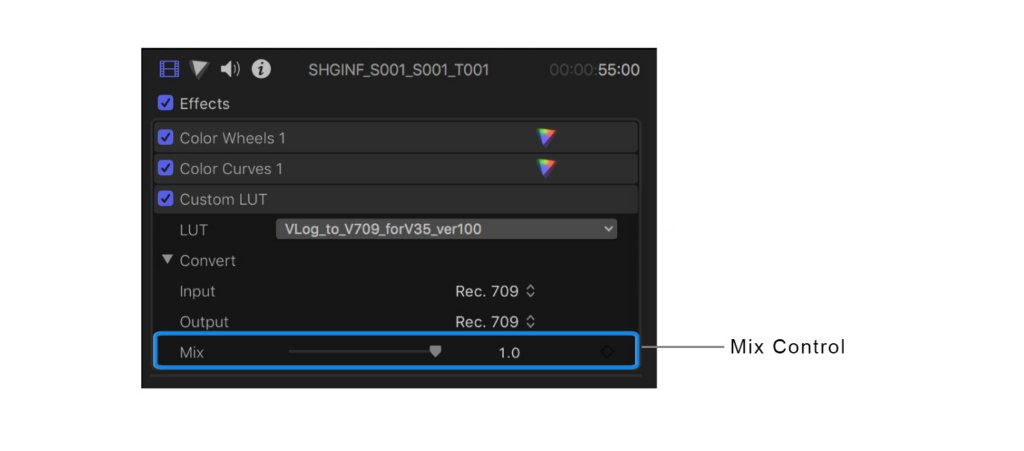
After applying the LUT, the next step is to adjust the effect’s strength. Inside the Custom LUT settings, you’ll find a Mix slider. This controls how much of the LUT is blended into the footage.

  1. Locate the Mix control
  2. Lower the percentage if the effect looks too strong
  3. Compare the footage before and after the adjustment

Many LUTs look overly harsh when set to 100%, especially on bright footage or clips with strong colors.

For beginners, a good starting range is often around 50–70%, then adjusted further depending on the shot.

Tip: LUTs are usually starting points rather than finished grades. Small adjustments often produce more natural-looking results than applying a heavy effect immediately.

Screenshot of a software panel showing video effects settings, including enabled Color Wheels, Color Curves, Custom LUT with 'VLog_to_V709_forV35_ver100' selected, and a 'Mix' slider set to 1.0.
Use the Mix Control to increase or decrease the LUT’s effect.

Step 5: Combine with color correction

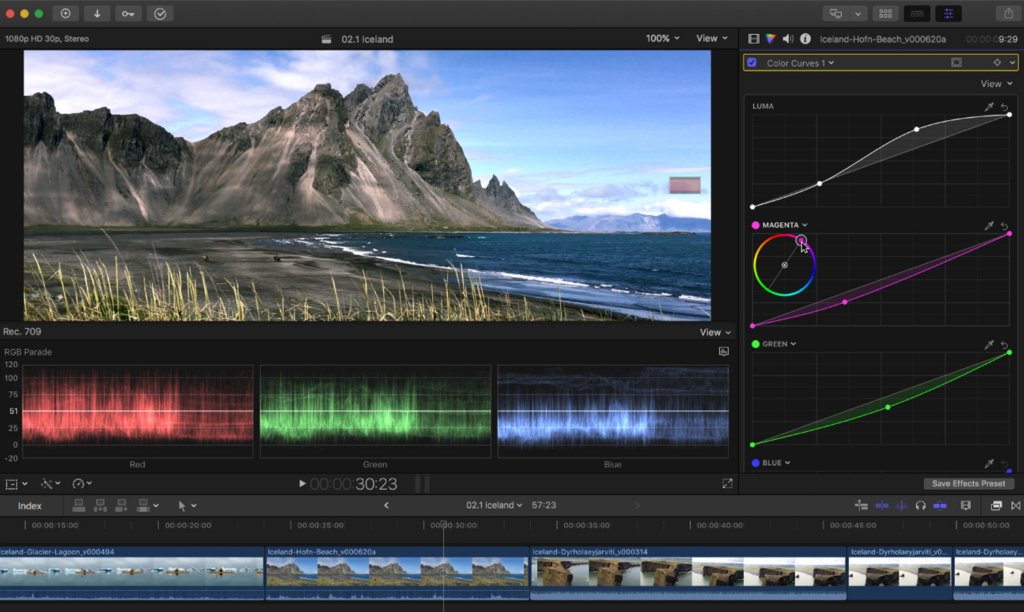
LUTs are often combined with manual color correction rather than used completely on their own. After applying the LUT, you can refine the image further using tools like:

  1. Color Wheels
  2. Color Curves
  3. Exposure controls
  4. Contrast adjustments
  5. White balance correction

For example, you might lower highlights, brighten shadows, or fix skin tones after the LUT has been applied.

  1. Open the color adjustment tools
  2. Fine-tune exposure and contrast
  3. Adjust white balance if colors appear too warm or cool
  4. Compare clips to maintain consistency across the timeline

Tip: LUTs generally work better after the footage has been balanced properly. Even small exposure or white balance fixes can noticeably improve the final result.

A screenshot of a video editing interface showing an Icelandic black sand beach and mountains, with color curves, RGB parade scopes, and a timeline visible.
Editing an Icelandic landscape video, showcasing color correction tools and RGB parade scopes in a professional video editing software.

How to add LUTs to log footage in Final Cut Pro

Log footage often looks flat or washed out before grading. This is normal and designed to preserve detail.

Correct LUT workflow:

When working with log footage in Final Cut Pro, the order of operations matters. A common workflow looks like this:

  1. Apply a camera conversion LUT (log → Rec. 709)
  2. Apply a creative LUT afterward

The first LUT is mainly used to normalize the footage into a standard viewing format. After that, creative LUTs tend to behave much more naturally and predictably. So remember, “Convert first → style second”.

Why conversion LUTs matter

Without a conversion LUT, creative LUTs can sometimes produce strange results on log footage. Colors may appear inaccurate, contrast may become too strong, and highlights can clip much faster than expected.

Applying the conversion LUT first usually gives you:

  • More natural contrast
  • Cleaner colour balance
  • More predictable skin tones
  • A better starting point for grading

Creative LUTs generally produce more balanced-looking results and are easier to fine-tune with manual grading tools afterward.

Tip: Cameras often use different log profiles, so it’s important to choose a conversion LUT that matches the footage you recorded (e.g., footage shot in S-Log, C-Log, or V-Log will usually need different conversion LUTs).

Best practices when adding LUTs in Final Cut Pro

Before applying LUTs across an entire project, it’s helpful to understand how different clips respond to them.

  • Use LUTs as a starting point
  • Match exposure before applying LUTs
  • Keep clips consistent across the timeline
  • Avoid stacking multiple LUTs
  • Refine with manual grading

Common mistakes when adding LUTs in Final Cut Pro

When first using LUTs in Final Cut Pro, a few issues tend to appear quite regularly. Most of them come from applying LUTs too heavily or using them on footage that hasn’t been properly prepared first.

1. Applying a creative LUT directly onto log footage

Creative LUTs can look far harsher on log footage if the clip has not been converted first. Colors may appear strange, highlights can clip quickly, and contrast may become too strong.

In most cases, a conversion LUT is applied first, followed by any creative styling LUTs.

2. Leaving the LUT strength at 100%

Applying the LUT at full intensity does not always produce the best result straight away. In some clips, colors may appear too saturated, or the image may become darker and more contrasty than expected.

Reducing the Mix slider slightly can help restore some detail and balance to the shot.

3. Using too many LUTs together

Adding multiple LUTs to the same clip can quickly make the image harder to control.

Colors may start looking unnatural, shadows can lose detail, and contrast may become overly strong. If that starts happening, removing a few grading layers is usually easier than trying to fix the image afterward.

4. Ignoring the original color profile

LUTs designed for one camera profile may not behave correctly when applied to another.

For example, a LUT built for S-Log footage may produce unusual colours if it’s applied to standard Rec.709 footage instead.

Pro tips

Once LUTs become part of your regular editing workflow, there are a few ways to speed up the process and keep projects easier to manage.

1. Save LUT presets for reuse

Some editors save their LUT settings as presets so they do not have to rebuild the same setup again on every project.

2. Use adjustment layers for consistency

Applying the LUT via an adjustment layer makes it easier to affect multiple clips at once. This is often simpler than copying the same LUT settings onto every individual shot.

3. Test multiple LUTs quickly

Different LUTs can push the same shot in completely different directions. One may cool the image down, while another may add warmer tones or heavier contrast. Trying a few different options side by side can make it easier to judge which one fits the footage better.

4. Build your own LUT stack

Some workflows separate correction and styling into different layers. For example, one LUT may be used to convert log footage first, while another is added afterward for the creative look.

How to add LUTs in Final Cut Pro FAQs

Conclusion

Learning how to properly add LUTs in Final Cut Pro speeds up color grading and makes it more consistent. By applying LUTs in the right order and adjusting them carefully, you can achieve better results without losing control over your footage.

LUTs work best as part of a workflow — not as a one-click solution. With the right approach, they can help you create a clean, professional-looking video much more efficiently.

Related Posts