
Envato LUTs category: preview LUTs on your own footage before you download
Explore the Envato LUTs category and discover 66,000+ searchable LUTs with previews, frame testing, commercial licensing, and compatibility across major editing software.
Envato: Get every type of asset for any type of project, and access to AI tools. Start now
Learn how to install transitions in Premiere Pro in this quick, practical walkthrough updated for 2026.

TL;DR: Installing transitions in Premiere Pro takes just a few minutes once you know where to look. Download your transition pack from Envato, import the included Premiere Pro project file, preview the transitions in the Source Monitor, and drag them onto the cut between clips. With a little organization and restraint, you can add smooth, professional transitions that elevate your edit without overcomplicating your workflow.
If you work with video, transitions are part of the job; they help your edits flow, guide the viewer’s eye, and make everything feel intentional. So if you’re wondering how to install transitions in Premiere Pro in 2026, you’re in the right place.
A transition is a short visual effect that helps one video clip flow smoothly into the next, making scene changes feel intentional rather than abrupt.
Instead of cutting directly from Clip A to Clip B, transitions create a visual bridge between scenes. This makes edits feel more natural and polished, especially when you’re moving between shots, locations, or moments in time.
Ask yourself one simple question:
Does this effect sit between two clips and visually connect them?
If the answer is yes, you’re looking at a transition.
A few useful things to know before you start installing and using them:
Once you know how to recognise a transition, it’s easier to see which ones are actually used most often in real-world edits.
Installing transitions in Adobe Premiere Pro is simpler than it looks, even if you’re brand new to video editing.
In this step-by-step guide, we’ll show you exactly how to add transitions in Premiere Pro, using clear instructions and helpful visuals so you can follow along with confidence and keep your edit moving smoothly.
Before learning how to install transitions in Premiere Pro, make sure your project assets are organized and easy to access. A little prep now saves time once you start editing.
You’ll need:
You can work with stock footage, your own recordings, or even AI-generated videos. For this tutorial, we’ll use ready-made transition files built specifically for Premiere Pro, available with an Envato subscription that includes AI tools & unlimited creative assets.

Once downloaded, place everything in a single folder. This makes importing into Premiere Pro quicker and keeps your project organized.
The first step when learning how to install transitions in Premiere Pro is setting up your project correctly. Start by opening Adobe Premiere Pro and clicking New Project. Give your project a name, then import your video files.
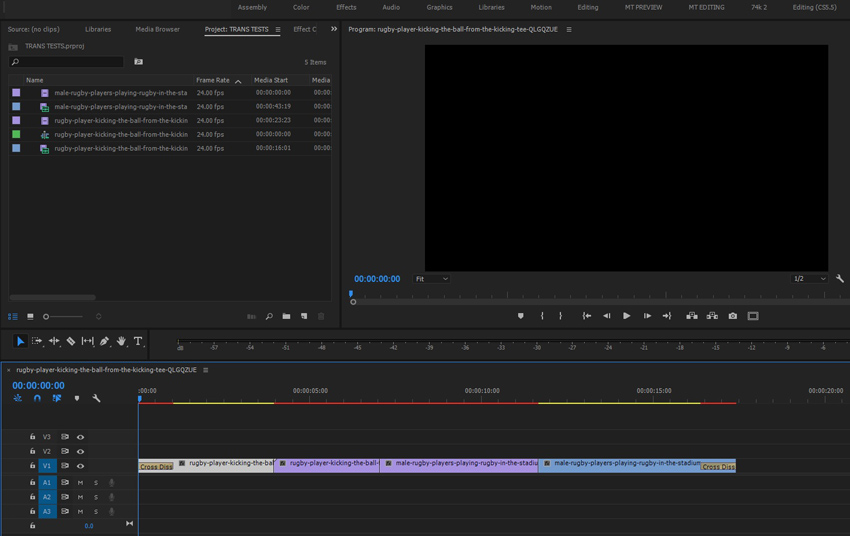
Once your assets are loaded, arrange your clips on the timeline in the order you want. With everything imported and organized, you’re ready to start adding transitions to your Premiere Pro edit.

Insert footage into your timeline. At this stage, since no transitions have been applied yet, you’ll only see hard cuts between each clip. That’s exactly what you want for now; it makes it easier to spot where transitions will have the biggest impact.
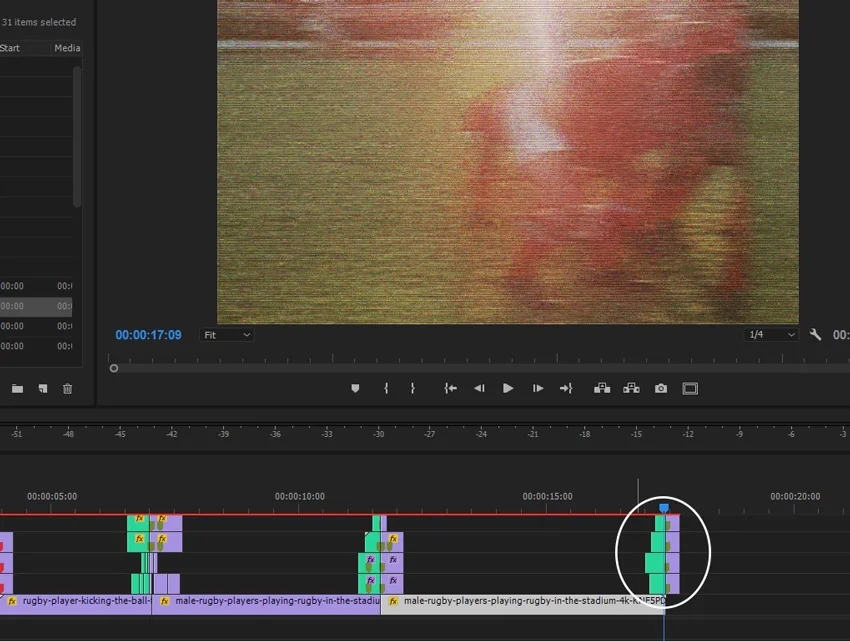
Here, you’ll learn how to install transitions in Premiere Pro using the transition files you’ve already downloaded. Once you’ve unzipped your transitions download, go to File > Import and navigate to where they’re saved. Instead of importing the individual MP4 files, look for the Premiere Pro project file— the one with the Premiere Pro icon, named Glitch Transitions.prproj.
When you’ve unzipped your transitions download, go to File > Import and navigate to where they’re saved. Rather than the individual files that may be in there (e.g., MP4s), look for the Project File with the Premiere Pro icon.
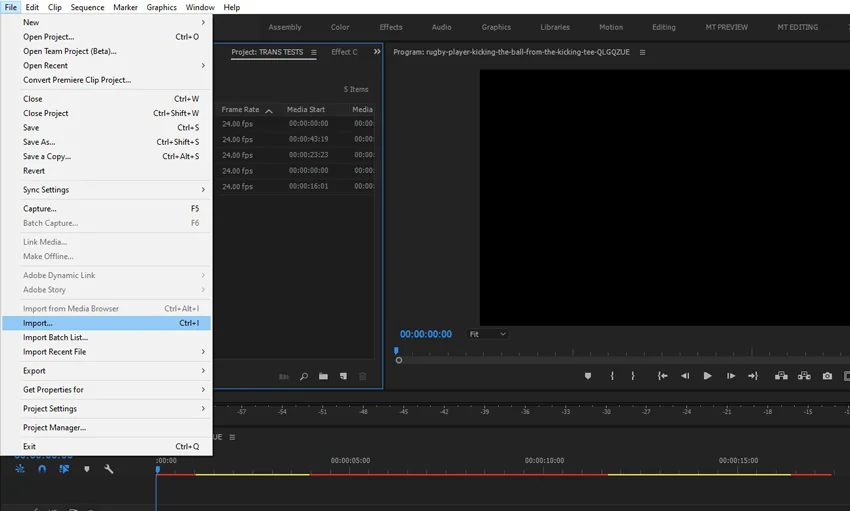
Then, go to File > Import.
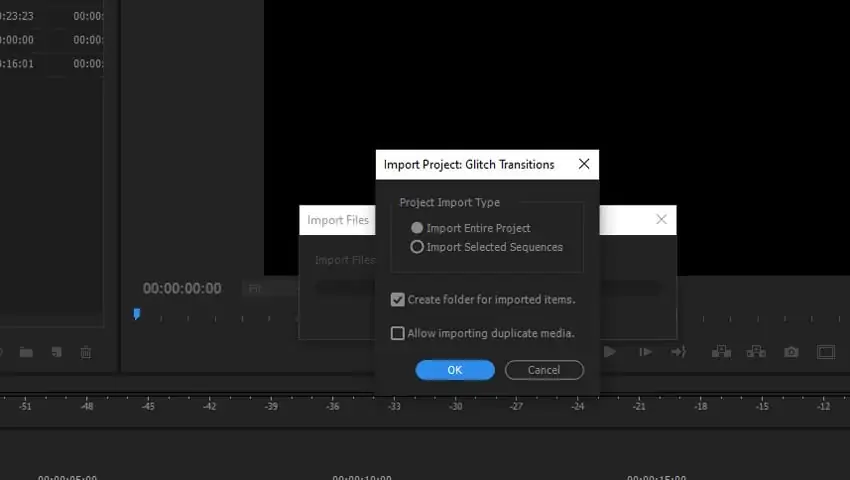
You’ll see a pop-up with a couple of options. Select Import Entire Project and tick Create Folder for Imported Items. This helps keep your transitions organized and easy to find inside the project.
You’ll then see that a new folder appears in the Project panel, with dropdown folders containing the transitions.
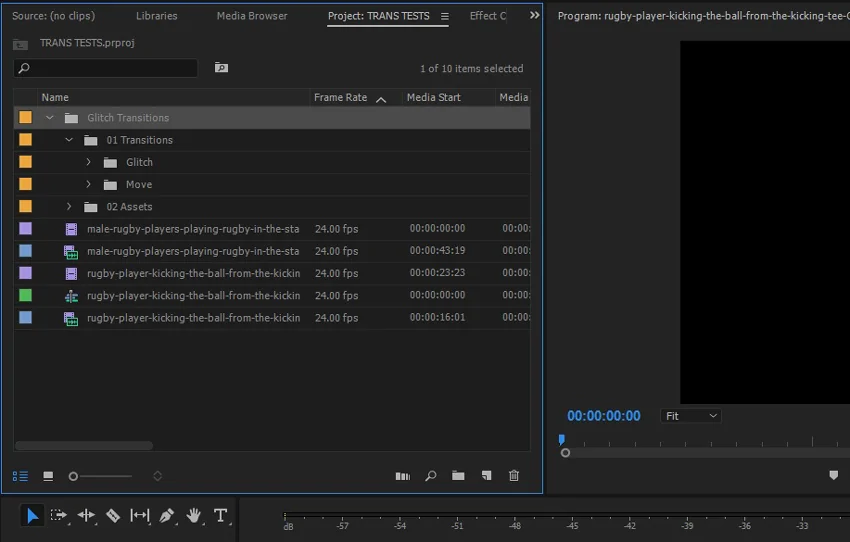
Inside this folder, you’ll find multiple subfolders, each containing the transitions.
Transitions and the assets that make them are split into separate, relevant folders. You can ignore the assets if you don’t want to change the transition effect.
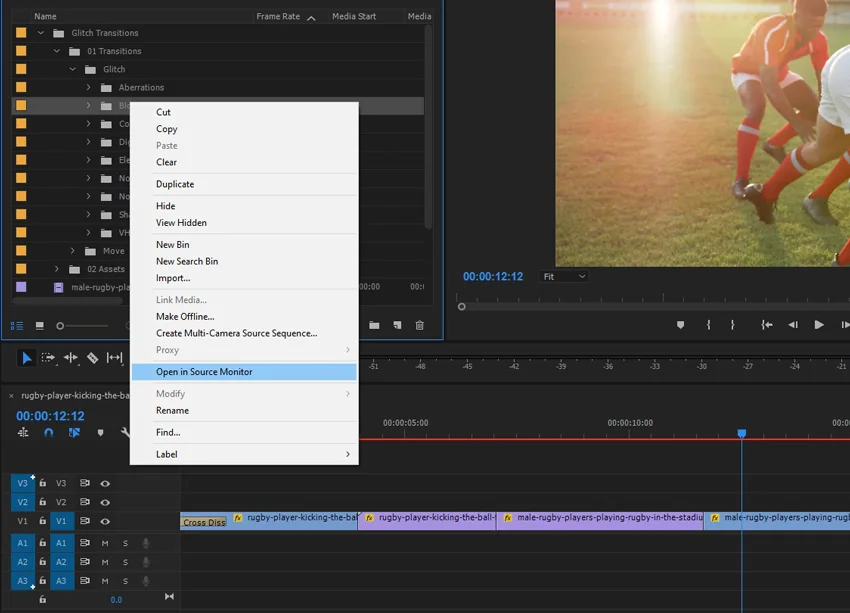
Choose Open in Source Monitor.
In Transitions > Glitch folders, each subsequent folder you see is a transition effect. You can right-click any folder and choose Open in Source Monitor.
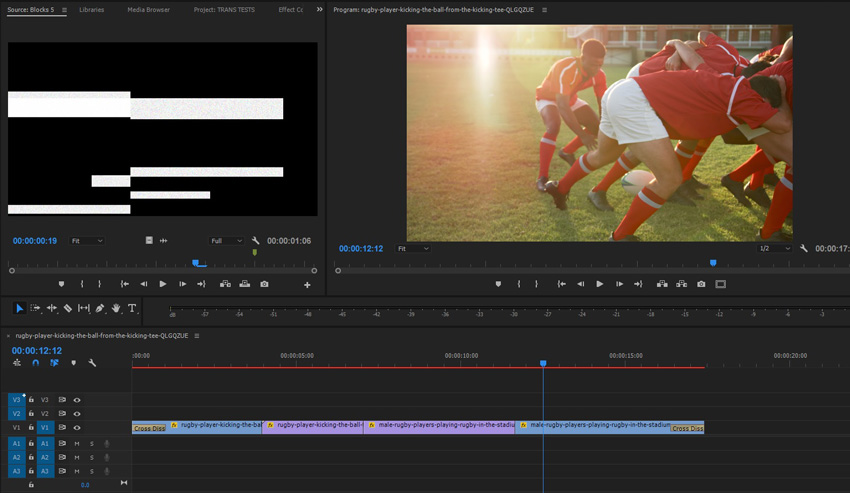
This lets you preview the effect in a new panel without adding it to your timeline. At this stage, you’ll only see the transition itself, not how it looks when applied to footage.
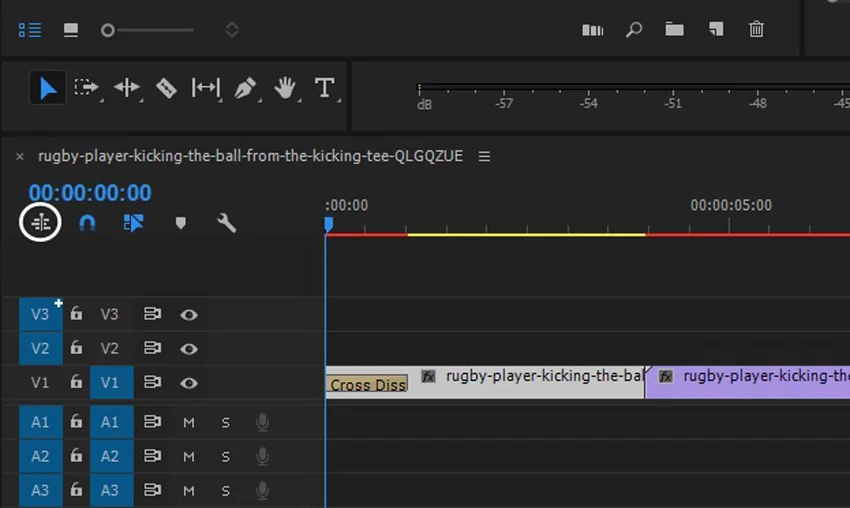
In your Timeline, you’ll see an icon on the left that looks like a file hierarchy. If you hover over it, it says, “Insert and overwrite sequences as nests or individual clips.” Click it to select it (it changes from blue to white), and you can edit the sequence as a single clip rather than splitting everything into multiple clips.
From your Project panel, drag a transition (whether you drag it from the Source Monitor or from the bottom-left panel where the transition folders live) into the timeline above where two pieces of footage meet. There’s an obvious join point, so you’ll be able to line up the transition with the cut between the video clips.
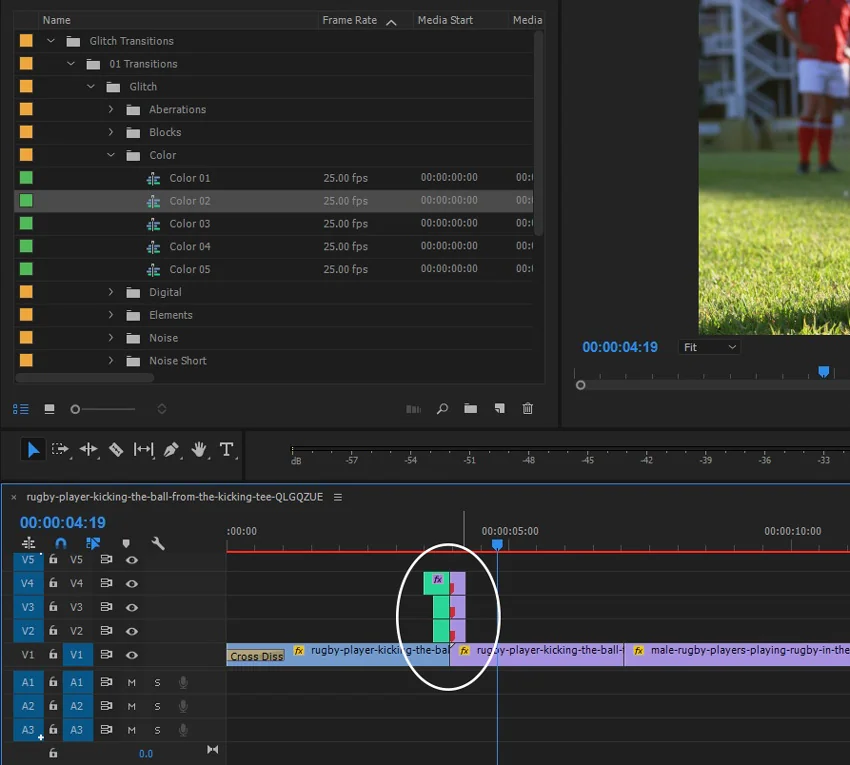
Then press play to see the transition effect applied to your footage.
From here, you can keep editing as needed, but remember, transitions aren’t just for cutting between clips. You can also place them at the start or end of your video, rather than only using them as fade-outs. And that’s it — no more steps needed. You can create a polished video in just a few minutes.
Once you’ve learned how to install transitions in Premiere Pro, the next step is choosing the right transitions for your edits. The most common video transitions are subtle effects like cuts, fades, and crossfades. Modern videos in 2026 tend to favor natural, unobtrusive transitions over flashy effects, keeping the focus on the story rather than the edit itself.
There are many types of video transitions, ranging from almost invisible to bold and highly stylised. In most cases, the best transitions are the ones viewers barely notice.
In recent years, video editing has leaned toward a clear “less is more” approach. Many trailers, announcements, and brand videos now favor transitions that feel natural and integrated, rather than flashy or attention-grabbing.
You can see the same thinking across design trends too — for example, the growing preference for soft, understated palettes like Cloud Dancer, which reflects a broader move toward calm, clarity, and restraint in creative work. In a video, that often translates to transitions that support the story without stealing the spotlight.
Ultimately, the right transition depends on your project’s style, message, and audience, not on how impressive an effect looks in isolation.
Transitions help your video feel intentional and professional by guiding viewers smoothly from one moment to the next.
Used thoughtfully, they shape pacing, soften scene changes, and give your edit a finished feel — even when you’re working with simple cuts.
At their best, transitions do their job quietly, helping the story come through without calling attention to the edit itself.
Now that you know how to install transitions in Premiere Pro, it’s time to play with pacing, rhythm, and style in your edits. Explore more Premiere Pro tutorials, video templates, and text animation presets to keep sharpening your editing skills and get more from every project you create.
However you like to work, we’ve got you covered — with AI tools and unlimited downloads of creative assets on Envato, free stock videos, music, and templates for Adobe Premiere Pro on Mixkit, and easy-to-use video templates on Placeit.
Installing transitions in Premiere Pro is easier than it looks; you just import the project file.
Most packs come as a .prproj file rather than individual effects. Download it, unzip the folder, then go to File > Import and choose Import Entire Project. Premiere Pro drops the transitions into your Project panel as neat, ready-to-use sequences you can preview and drag straight into your edit.
Drag the transition onto the edit point between clips. Locate the cut in your timeline and place the transition so it overlaps that join. If it doesn’t apply cleanly, trimming a few frames from each clip usually fixes the issue.
In video editing, transitions connect clips, while VFX affect individual clips.
A transition sits between two clips and controls how one shot flows into the next. VFX are applied to a single clip and alter its appearance, such as colour effects, distortions, or overlays.
Add a transition by placing it on the cut between two clips. With your footage on the timeline, drag a transition so it sits over the edit point where one clip meets the next. Press play to preview the result. Built-in transitions work the same way, but custom packs give you more creative control.
Yes, transitions work with almost any video format. As long as your clips are on the timeline and use compatible settings, you can apply transitions between them. Some stylised transitions suit certain footage better, but they’re not limited to specific cameras or codecs.
Yes, it’s best to add transitions after your main edit is finished. Locking your cuts first helps you focus on pacing and storytelling. Once the structure feels right, transitions become a subtle finishing touch instead of a distraction.
Explore the Envato LUTs category and discover 66,000+ searchable LUTs with previews, frame testing, commercial licensing, and compatibility across major editing software.

Every month, we're rounding up our favourite TikTok trends: the sounds, hooks, and concepts that are going viral right now. We'll break down the formats, show you examples, and give you practical ways to adapt them to your niche.

Found a template that's almost perfect? This guide walks you through editing Envato video templates in any software, with a repeatable process for swapping media, text, colors, and music, then exporting a finished video.

Download a video template and you get the design system, not the finished video. Here's what to expect — and what to source separately.