Movie typography in 2026: why does it suddenly look so good?
Explore movie typography trends shaping 2026, from bold film fonts to cinematic branding, with inspiring examples and practical tips for creating impactful, screen-ready typography.
Envato: Get every type of asset for any type of project, and access to AI tools. Start now
Want to learn how to use DaVinci Resolve 18? In this beginner's guide, we'll cover everything you need to get started – including how to import footage, edit takes, and even perform color correction.
Adored by filmmakers and video creators everywhere, DaVinci Resolve is the world’s only post-production software that combines editing, color correction, visual effects, motion graphics, and audio post-production all in one program. This powerful all-in-one video-editing software is bursting with post-production tools for editing footage, adding special effects, tweaking sound, and color grading. And – perhaps best of all – it’s free!
While this program might initially seem overwhelming, our beginner’s guide contains everything you need to get started in DaVinci Resolve 18 – such as importing footage, editing takes, adding graphics, logos, text, and even some basic color correction. Let’s dive in!
This course is for beginners to DaVinci Resolve, so let’s start right at the beginning – downloading the software! Go to the Blackmagic Design website and click Free Download Now to download DaVinci Resolve 18.
The paid option, DaVinci Resolve Studio, does give you some extra features, but the free version is what we’ll use in this course – it’s very powerful and perfect for beginners. Make sure also to Download the Course Files used in this course.
When you open DaVinci Resolve for the first time, here’s what you’ll see:
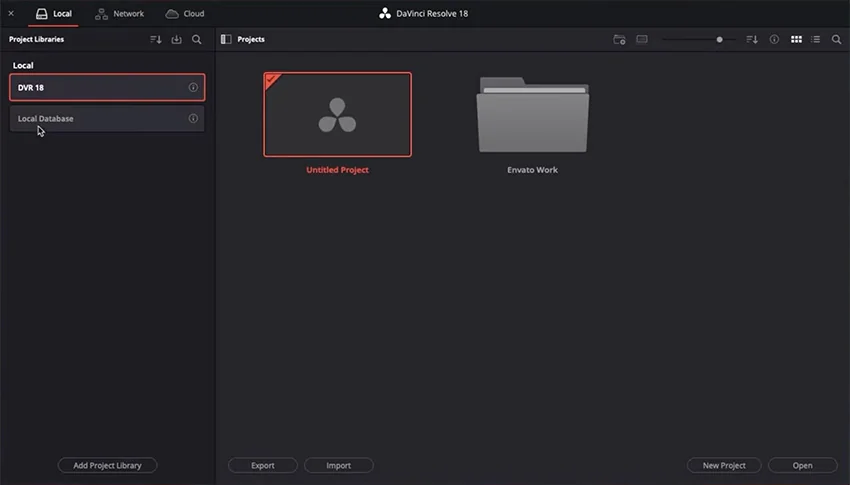
It’s not very intuitive, but don’t worry – that’s what this quick-start guide is for! Project libraries are simply folders to store and organize your DaVinci Resolve projects.
For now, just double-click on Untitled Project to open it. Then you’ll see another not-very-intuitive screen:

DaVinci Resolve offers you seven primary tabs, which you can access using the icons along the bottom of the screen:
In the rest of this quick-start guide, we’ll primarily be working with the Edit tab.
You can import footage right from the Edit tab in DaVinci Resolve. Just right-click in the Media Pool and choose New Bin. This will create a folder in the Media Pool to help you keep things organized.
Then you can right-click > Create New Timeline to add a new timeline with the following settings.

Now you can just drag and drop footage, audio, and other resources into the Media Pool; from there, you can drag them into the timeline, and you’ll see a timeline appear across the bottom.

Now that we have our video in the timeline let’s edit it. An easy way to edit a clip is to press B and use the Blade Tool to cut a track to the point you click. For example, you can just click and drag from the end of the track if you want to cut the end off.

DaVinci Resolve is a non-destructive editor, so you’ll always have access to the original video and audio clips, no matter how many edits you make. You can also make edits with the Effects panel, which gives you some excellent premade effects for your videos.
The Inspector panel is a valuable tool for DaVinci Resolve video editing. It appears on the top-right of the screen when you’ve selected a clip, and it lets you make detailed edits simply by typing over the numbers you see in the panel.

You can use this, for example, to rotate, crop, zoom, reposition, etc. You can even add blending modes and opacity to create some interesting effects, so explore this panel and see what all the tools can do.
Learning some keyboard shortcuts can make your editing work so much easier. Here are some essential DaVinci Resolve shortcuts that you’ll be using all the time to navigate the timeline:
I produced a separate course on color grading in DaVinci Resolve, so be sure to watch that if you want more detail, but here’s a quick look at the basics of color grading.

Click on the fifth icon at the bottom of the screen to open the Color tab.
Use the Lift wheel to work on the shadows, Gamma for the mid-tones, Gain for the highlights, and Offset for global adjustments.
The boxes above and below the color wheels let you adjust the Contrast, Hue, Saturation, and more.
When you’re happy with one clip, just select the others and right-click > Apply Changes to apply a consistent color grade to all the clips in your project.
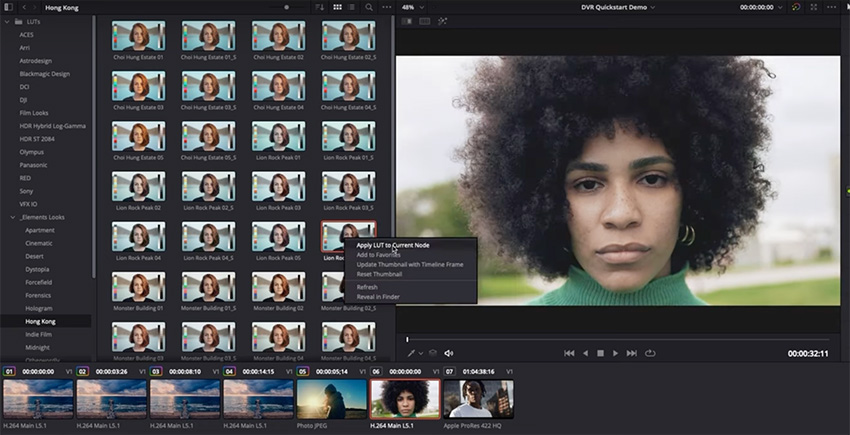
While on color grading, let’s look at how to use LUTs in DaVinci Resolve. LUTs are filters you can apply to your footage for a particular look.
Apply them by clicking on LUTs in the top-left corner of the screen when you’re in the Color tab. You’ll see some built-in LUTs designed for particular cameras, but you can also download premium LUTs for DaVinci Resolve from Envato Elements.
When you’ve imported your chosen LUTs, all you need to do is click on them to get a preview of the effect on your footage, and when you decide on the one you want, just right-click > Apply LUT to Current Node.
Now that we’ve covered the basics of editing and color grading video in DaVinci Resolve let’s see how to export our video.
To export from DaVinci Resolve, go to the Deliver tab and select the in and out points of the video in the timeline. On the left-hand side, you’ll see the Render Settings. Choose H.264 Master, which gives you the right basic settings for uploading video to the web. Change the Format to MP4 and leave the others as they are unless you want to make changes, such as selecting a higher-quality output. Then click Add to Render Queue, and that’s it!
With the skills and techniques you’ve learned in this quick-start guide, you’re now ready to jump in and start editing videos in DaVinci Resolve. For a more detailed, comprehensive DaVinci Resolve tutorial, check out this guide for more advanced video-editing techniques.
While you’re here, check out these top 10 DaVinci Resolve tutorials on Tuts+. Or, take your video-editing skills to the next level by downloading some powerful DaVinci Resolve templates from Envato Elements today!
Explore movie typography trends shaping 2026, from bold film fonts to cinematic branding, with inspiring examples and practical tips for creating impactful, screen-ready typography.
Seedance 2.0 — ByteDance's AI video model known for its physical realism and scene complexity — is now part of the model lineup behind Envato's AI video generator. Here's what changes.
Discover bold music video fonts for 2026, with top picks and bonus styles that help creators match sound, genre, and mood with striking visual identity.

Learn how to build an AI character design workflow, from generating concepts with AI to refining and transforming them into clean, stylised 3D characters in Blender.