Envato: Get every type of asset for any type of project, and access to AI tools. Start now

How to Import LUTs in CapCut

A step-by-step guide to importing LUTs in CapCut on mobile and desktop, covering .cube file downloads, CapCut's colour adjustment tools, intensity control and export settings. Includes the difference between technical and creative LUTs, troubleshooting for missing LUT options and over-graded results, plus tips for previewing LUTs before you download them.

Jonathan Lam & Jo Birleson 9min read
A graphic showing a stylish person with sunglasses and text 'How to import LUTS in CapCut' with the CapCut logo. The background is split diagonally, featuring cityscapes and color grading interfaces.

LUTs turn up in all sorts of places now. You might download one as part of a video template, get one from a creator you follow, or end up with a folder full of them after buying a bundle and forget where half of them came from.

CapCut can import LUT files directly, but finding the option isn’t always the difficult part. More often, it’s working out which LUT to use, how strong it should be, and whether the result actually suits the footage you’ve shot.

This CapCut LUT tutorial covers how to import LUTs in CapCut, how to add LUTs in CapCut to a project, and a few practical checks worth making before exporting your final video. The same process can be used as part of a wider mobile LUT workflow or desktop editing setup.

TL;DR

Some LUTs look great straight away. Others need a bit of adjustment before they settle into the footage. We’ll look at where to import LUTs in CapCut and a few ways to fine-tune the result afterwards.

We’ll also look at Envato’s new LUTs category, which lets you preview LUTs before downloading them and even test them against your own footage.

How do you import LUTs in CapCut?

  1. Download a LUT from Envato and locate the .cube file.
  2. Open CapCut and import your footage.
  3. Select the clip and open the CapCut colour grading tools.
  4. Import the LUT and preview the result.
  5. Adjust the LUT strength and export your video.

What are LUTs in CapCut?

LUTs (Look-Up Tables) are files that change the colours in your footage according to a predefined set of instructions. You can use them to create a particular look or to convert footage from one colour space to another.

LUTs tend to come in small files with names that hint at the look they’re aiming for. Some are designed to correct footage from a particular camera profile, while others are purely creative. Most fall into one of two categories.

Technical LUTs

Technical LUTs are often used with footage shot in flat or log colour profiles. They’re designed to bring colour and contrast back into the image before any creative grading begins. Their job is to transform footage between different image formats or display standards.

They are often used with log recording formats, including Sony S-Log and Canon Log (C-Log). One common use is converting log footage into Rec. 709 for standard viewing and editing workflows.

Technical LUTs are typically applied near the start of the editing process, before any creative colour work begins.

Creative LUTs

Creative LUTs are more about style than correction. They’re the LUTs you’ll usually find in cinematic, vintage, travel, film, and social media collections. Different LUTs can produce very different results, even when applied to the same clip.

Different creative LUTs can shift color response, contrast, and tonal balance to produce different visual styles. Many downloadable LUT packs, such as those available from Envato, are intended for this stage of the workflow.

Where to find LUTs for your project

Finding LUTs is one thing. Finding the right LUT for your footage can be even more difficult. Which is why Envato’s LUTs marketplace comes with thousands of easily searchable LUTs.

With Envato, preview videos are available, and you can upload your own frame before downloading. Envato’s LUTs category includes more than 66,000 searchable LUTs. Each LUT has its own page rather than being bundled into a large collection.

LUTs include commercial licensing and support Premiere Pro, DaVinci Resolve, After Effects, CapCut, Final Cut Pro, and many other editing tools. This flexibility makes it easier to move between desktop editing and a mobile LUT workflow when needed.

Step 1: Download a LUT

Before importing a LUT into CapCut, you’ll need a compatible LUT file. Most LUTs are supplied as .cube files, which are supported by a wide range of editing applications.

  1. Visit the Envato LUTs marketplace and browse the available LUTs.
  2. Choose a LUT that suits your footage and download it.
  3. Extract the download if required and locate the .cube file.

Tip: If you’re browsing multiple LUTs, preview them on Envato before downloading. This can save time later when testing different looks against your footage.

Once you have your .cube file ready, open up Adobe After Effects and move on to the next step.

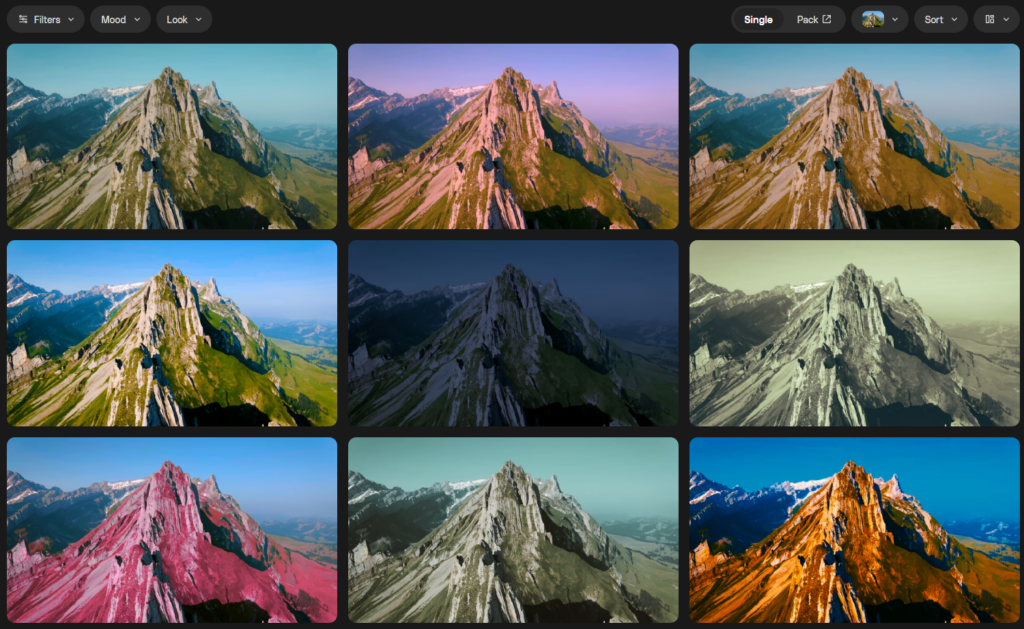
A grid of nine identical mountain landscape photos, each with a different color filter applied, demonstrating various visual moods and styles.
Exploring diverse moods and aesthetics with various color filters applied to a stunning mountain landscape.

Step 2: Import footage

With your LUT file ready, it’s time to bring your footage into CapCut.

  1. Open CapCut and create a new project.
  2. Add the video clips you want to edit.
  3. Place the footage on the timeline.
  4. Select the clip that will receive the LUT.

Once your footage is loaded and selected, you’re ready for the next step.

CapCut video editing software interface showing 'Create project' button, AI-powered tools, and a navigation sidebar.
Explore the CapCut interface, ready to ‘Create project’ with professional and AI-powered video editing tools. From scripting to AI image generation, it’s all here!

Step 3: Open color tools

CapCut’s LUT controls are located within the colour adjustment settings for a clip.

  1. Select the clip you want to edit.
  2. Open the colour adjustment tools.
  3. Locate the LUT section within the available controls.
  4. Open the LUT menu.

The layout may differ slightly between mobile and desktop versions of CapCut.

CapCut video editor interface showing the 'Adjustment' and 'LUT' options selected. A video preview displays two people in a convertible driving towards a sunset. The timeline shows the video clip.
Exploring color adjustments and LUTs in CapCut to enhance video footage, as shown with a sunset driving scene.

Step 4: Import the LUT

With the LUT controls open, you can now load your .cube file.

  1. Select the LUT import option.
  2. Browse to the location of your .cube file.
  3. Choose the LUT you want to use.
  4. Confirm the import.

CapCut will apply the LUT to the selected clip.

Screenshot of the CapCut video editor interface. The 'Adjustment' tab is open, showing a selected LUT thumbnail of a child eating watermelon. A blue arrow points from the LUT to an 'Adjust2' layer on the timeline, which is above a video layer of two people in a car at sunset.
Applying a custom LUT in CapCut to enhance video footage, as shown by the selected LUT being added to the timeline.

Step 5: Apply and preview

Once the LUT has been imported, take a moment to look at the result before moving on.

  1. Play through the clip and watch the preview window.
  2. Compare different parts of the footage, especially scenes with changing lighting.
  3. Check that skin tones, shadows, and highlights still look natural.
  4. Try enabling and disabling the LUT to see how much it changes the image.

Some LUTs have a subtle effect, while others can dramatically change the colours and contrast. Once you’re happy that the LUT is working correctly, you can fine-tune the strength in the next step.

Step 6: Adjust strength

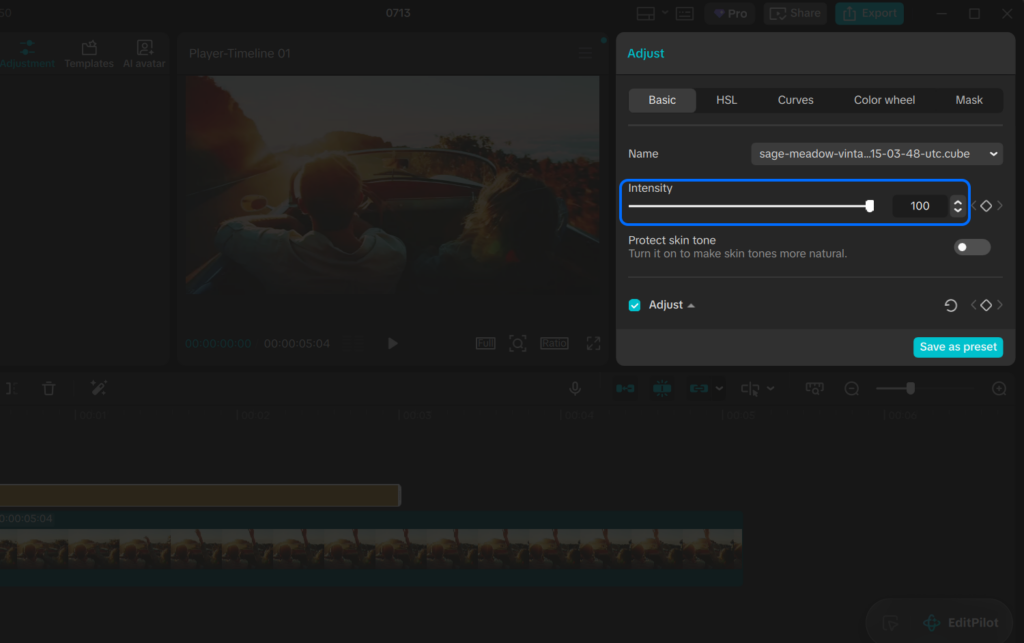
Not every LUT will look perfect straight after being applied. CapCut allows you to control how strongly the LUT affects your footage.

  1. Locate the Strength or Intensity slider in the LUT controls.
  2. Move the slider left to reduce the effect.
  3. Move it right to increase the effect.
  4. Preview the footage as you make adjustments.

It’s common to pull a LUT back slightly rather than using it at full strength. Small adjustments can sometimes make a noticeable difference, particularly when working with footage shot in different lighting conditions.

A video editing software interface showing a car scene at sunset in the preview, with the 'Adjust' panel open and the 'Intensity' slider set to 100.
Adjusting video intensity in a dark-themed editing software, with a sunset car scene in the preview. The intensity slider is set to 100 for the ‘sage-meadow-vinta’ preset.

Step 7: Export your video

With the LUT applied and adjusted, the final step is to export your project.

  1. Click the Export button.
  2. Choose your preferred resolution and frame rate.
  3. Review the export settings.
  4. Start the export process and wait for CapCut to render the video.

Troubleshooting

Most LUT imports work without any issues. If something doesn’t look quite right, the points below are a good place to start.

LUT option missing

LUT support is not available in every version of CapCut. Check that your version includes LUT imports before continuing.

Colours appear extreme

The same LUT can look very different depending on the footage. Lowering the LUT strength often produces a more balanced result.

Mobile performance issues

Projects with multiple effects may play back more slowly on some devices. Closing unused apps can help free up resources while editing.

Pro tips

A few things are worth keeping in mind when working with LUTs in CapCut.

Preview LUTs before downloading

Envato includes preview videos for individual LUTs, along with a frame upload tool that allows you to test LUTs against your own footage before downloading them.

Use subtle intensity adjustments

The intensity slider can be used to increase or reduce the strength of a LUT after it has been applied.

Save reusable looks

CapCut projects can contain multiple LUTs and colour adjustments. Keeping track of LUTs that you’ve used before can make them easier to find later, particularly if you’re building a regular mobile LUT workflow.

Conclusion

After the first import, the process tends to become routine. Download the LUT, load the file, check the result, and continue editing.

A look that works well on one clip can feel completely different on another, which is why many editors spend more time comparing LUTs than importing them. CapCut handles the import process quickly, leaving the creative decisions to you.

If you’re looking for more options, Envato’s LUT library includes individual LUT pages, preview videos, frame uploads, and LUTs that work across CapCut and other editing applications.

How to import LUTs in CapCut FAQs

Does CapCut support .cube LUTs?
Yes. If you’ve downloaded a LUT and it comes as a .cube file, that’s generally the format you’ll be looking for.

Can I use desktop LUTs in CapCut?
In many cases, yes. LUTs created for desktop editing applications such as Premiere Pro, DaVinci Resolve, and After Effects can also be used in CapCut, provided they are supplied as compatible LUT files.

Are LUTs available on mobile and desktop?
Yes. CapCut supports LUT workflows on supported mobile and desktop versions. The location of the controls may differ depending on the platform and version being used.

Related Posts