
Envato: Get every type of asset for any type of project, and access to AI tools. Start now

How to import LUTs to Premiere Pro

A step-by-step guide to importing LUTs in Premiere Pro through the Lumetri Color panel, covering technical vs creative LUTs, adjusting intensity, and fixing common colour-grading mistakes.

Jonathan Lam 12min read
A graphic featuring a person in a dynamic pose, with text 'How to import LUTs in Premiere Pro' and the Premiere Pro logo. The background includes sky, a graph, color grading wheels, and an archway.

Adobe has continued to expand Premiere Pro’s colour grading tools in recent releases, including the introduction of Color Mode. Alongside these newer features, LUTs remain one of the quickest ways to establish a starting point for your grade.

A few years ago, finding the right LUT usually meant downloading an entire pack and hoping one of the files inside would work with your footage. But things are easier now with Envato’s new LUTs category.

Applying a LUT in Premiere Pro has always been straightforward. Finding the right LUT has generally been the harder part.

This guide walks you through importing LUTs in Premiere Pro step by step, plus a few tips to help you dodge the mistakes most editors make when they’re starting out. We’ll also look at Envato’s new LUTs category, which lets you preview LUTs and test them against your own footage before downloading.

TL;DR

LUTs can be a quick way to get your footage closer to the look you’re after, and a Premiere Pro LUT workflow makes them easy to work with through the Lumetri Color panel. We’ll look at How to import LUTs in Premiere Pro, when to use it, and a few things worth knowing before you start applying them to every clip in your timeline.

How do you import LUTs in Premiere Pro?

  1. Download a LUT and locate the .cube file.
  2. Open Premiere Pro and select your clip.
  3. Open Window > Lumetri Color.In Basic Correction, click Browse next to Input LUT.
  4. Select the LUT file and click Open.

What are LUTs in Premiere Pro?

LUTs (Look-Up Tables) are files that change the colours in your footage according to a predefined set of instructions. Editors use them to create a particular look or to convert footage from one colour space to another.

How LUTs are used in video editing

Most editors encounter LUTs during the colour grading stage of post-production. Some are designed to correct footage, while others are used to create a specific visual style. For example, a LUT might:

  • Add warmer tones to skin
  • Create a cooler cinematic look
  • Increase contrast and saturation
  • Simulate a film-inspired colour grade

LUTs speed up the grading process, but most workflows still require manual adjustments afterward. There are two types to know.

Technical LUTs

Technical LUTs are used as part of a colour management workflow. Their job is to transform footage between different image formats or display standards.

They are often used with log recording formats, including Sony S-Log and Canon Log (C-Log). One common use is converting log footage into Rec. 709 for standard viewing and editing workflows.

Technical LUTs are typically applied near the start of the editing process, before any creative colour work begins.

Creative LUTs

Creative LUTs are applied after the main correction process to alter the image’s appearance.

Different creative LUTs can shift color response, contrast, and tonal balance to produce different visual styles. Many downloadable LUT packs, such as those available from Envato, are intended for this stage of the workflow.

Unlimited Creative Assets. Access to AI Tools.

Advanced Cinematic LUTs for Wedding Videographers: 30 Must-Have Presets

aaapresets
Advanced Cinematic LUTs for Wedding Videographers: 30 Must-Have Presets

Traveller LUTs for Final Cut

Playground_Studio
Traveller LUTs for Final Cut

Art Film LUTs

Playground_Studio
Art Film LUTs

Moody Travel LUTs

Playground_Studio
Moody Travel LUTs

Sunset LUTs

Playground_Studio
Sunset LUTs

Film Emulation LUTs for Final Cut

Playground_Studio
Film Emulation LUTs for Final Cut

Supported LUT formats

For the most part, Premiere Pro users only need to be aware of one LUT format: .cube.

It’s the standard format used throughout the video industry and the format you’ll find in most LUT packs. If you’ve downloaded LUTs from Envato, chances are they’ll be supplied as .cube files and ready to import straight into Premiere Pro.

Where to find LUTs for your project

Envato’s LUTs marketplace includes thousands of searchable LUTs, which means that you can browse individual LUTs rather than downloading large ZIP packs and hoping something works.

Each LUT has its own page, complete with preview videos that show before-and-after results. You can also upload your own frame to see how a LUT might look on your footage before downloading it.

LUTs are supplied with commercial licensing and can be used across a range of editing and colour grading applications, including Adobe Premiere Pro, DaVinci Resolve, After Effects, CapCut, Final Cut Pro, and many other popular tools. Next we’ll look at how to install LUTs in Premiere Pro.

Step 1: Download a LUT

  1. Visit the Envato LUTs marketplace and browse the available LUTs.
  2. Choose a LUT that suits your footage and download it.
  3. Extract the download if required and locate the .cube file.

Tip: If you’re browsing multiple LUTs, preview them on Envato before downloading. This can save time later when testing different looks against your footage.

Once you have your .cube file ready, open Premiere Pro and move on to the next step.

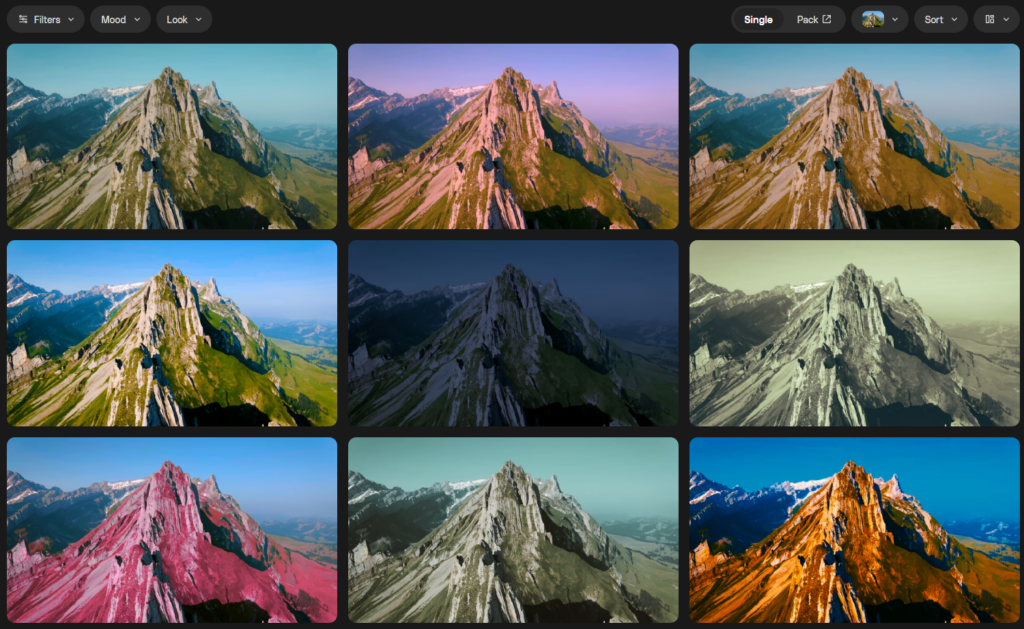
A grid of nine identical mountain landscape photos, each with a different color filter applied, demonstrating various visual moods and styles.
Exploring diverse moods and aesthetics with various color filters applied to a stunning mountain landscape.

Step 2: Add LUTs to Lumetri Color

With your LUT downloaded from Envato, it’s time to open Premiere Pro’s colour grading tools.

  1. Open your project and select the clip you want to work with.
  2. Go to Window > Lumetri Color.
  3. Now that it’s in your workspace, we’ll Add LUTs to Lumetri Color via the dropdown boxes.

Once the panel is open, you’re ready to import your LUT.

Screenshot of video editing software showing a person holding a blue smoke grenade and the Lumetri Color panel.
A person with a shaved head and nose ring holds a blue smoke grenade in an industrial setting, as seen within a video editing software’s Lumetri Color panel.

Step 3: Apply LUTs in Premiere Pro via Basic Correction

Now it’s time to import the LUT you downloaded from Envato.

  1. In the Lumetri Color panel, open the Basic Correction section and locate the Input LUT dropdown.
  2. Click Browse, then select your LUT’s .cube file.
  3. Click Open to apply LUTs in your Premiere Pro footage.

Premiere Pro will immediately apply the LUT to your footage. If the LUT was designed for your camera’s LOG profile, you should notice the image gain contrast, colour, and saturation as soon as it’s loaded.

At this stage, don’t worry if the image isn’t perfect. The LUT provides a starting point, and you’ll have an opportunity to make further adjustments later in the workflow.

Screenshot of video editing software showing a person holding a blue smoke grenade emitting blue smoke, with the Lumetri Color panel open on the right displaying color correction settings.
Applying color grading to a video frame featuring a person with a blue smoke grenade in an industrial setting, using Lumetri Color in video editing software.

Step 4: Add Creative LUTs

If you’ve already applied a technical LUT, you can now experiment with creative LUTs to develop the final look of your footage.

  1. Open the Creative section in the Lumetri Color panel and click Browse next to the Look dropdown.
  2. Select a creative LUT from your Envato download and click Open.
  3. Preview the result and try different LUTs until you find a look that suits your footage.

The LUT will be applied immediately, allowing you to preview the effect on your footage.

Unlike technical LUTs, creative LUTs are designed to influence the mood and style of an image. You might try a few different options before settling on the one that best suits your project. In the next step, we’ll look at how to save LUTs and colour settings for future projects.

Screenshot of video editing software showing a person holding a purple smoke grenade, with the Lumetri Color panel open on the right, applying a 'crimson-foliage-retro-film' look.
Applying a ‘crimson-foliage-retro-film’ look with Lumetri Color to a clip featuring a person with purple smoke, enhancing the dramatic aesthetic in video editing software.

Step 5: Save LUTs for future projects

If you find yourself using the same LUTs regularly, it can be worth saving them as presets. This saves you from having to manually import and configure the LUT every time you start a new project.

  1. Select the clip that already has the LUT applied.
  2. In the Effect Controls panel, right-click Lumetri Color.
  3. Select Save Preset.
  4. Give the preset a name and click OK.

The preset will now appear in Premiere Pro’s Effects panel and can be applied to other clips in future projects.

If you’re working on a series of videos with a consistent visual style, saving presets can help speed up your workflow and keep your colour grading consistent from project to project.

A screenshot of a video editing software interface showing the 'Effect Controls' panel with 'Save Preset...' highlighted for 'Lumetri Color', and a video frame displaying a person surrounded by purple smoke.
Saving a custom Lumetri Color preset in video editing software, featuring a stylish shot with purple smoke.

Step 6: Adjust Intensity and Blend

A LUT doesn’t have to be used at full strength. In many cases, reducing the intensity can produce a more natural result, especially when working with creative LUTs. A subtle grade is often more effective than one that’s immediately obvious.

To adjust the strength of a creative LUT:

  1. Open the Creative section in the Lumetri Color panel.
  2. Locate the Intensity slider.
  3. Drag the slider left or right until you’re happy with the result.

As you make adjustments, pay close attention to skin tones, highlights, and shadow detail. If the LUT is making the image look too harsh or oversaturated, reducing the intensity can often bring things back into balance.

There’s no correct setting here. The goal is simply to find a look that works for your footage and the style of project you’re creating.

Screenshot of a video editing interface showing a person with purple smoke and color grading settings in the Lumetri Color panel.
Enhancing the mood with color grading and increasing the intensity setting: A striking scene featuring purple smoke being edited in video software.

Common mistakes

Now that you know how to install LUTs in Premiere Pro, let’s take a look at some common mistakes. Most LUT problems aren’t caused by a Premiere Pro LUT workflow. They’re usually caused by applying the wrong LUT, applying it at the wrong stage, or simply expecting too much from it.

Applying a LOG LUT to Rec.709 footage

If a LUT makes your footage look dramatically worse rather than better, don’t panic.

A common cause is simply using a LUT that wasn’t designed for the footage you’re working with. What looks great on one camera profile can produce some pretty strange results on another.

If the colours look unnatural or the contrast suddenly feels excessive, double-check that the LUT matches your footage before making any further adjustments.

Using LUTs before colour correction

Sometimes a LUT gets blamed for problems it didn’t create.

If a clip is already looking a little off before the LUT is applied, chances are it will still look off afterwards. A quick pass to sort out exposure and colour can make the grading process much easier. A few basic corrections first can go a long way.

Over-processing footage

Most editors have done this at some point. You find a LUT you like, increase the intensity, add another adjustment, then another. Before long, the image looks nothing like the footage you started with.

If something feels off, try simplifying things. Reducing the LUT strength or removing a few adjustments is often enough to bring the image back under control.

Pro tips

There isn’t a single “right” way to work with LUTs, but the following tips are worth keeping in mind.

Don’t judge a LUT too quickly

Not every LUT looks its best straight away. It’s easy to load a LUT, glance at the result, and move on to the next one. In practice, a small adjustment to exposure, white balance, or LUT intensity can completely change how it looks.

If a LUT seems close to what you’re after, spend a minute making a few tweaks before dismissing it.

Keep technical and creative LUTs separate

When a grade starts going wrong, it helps to know exactly where each change is coming from.

Many editors Apply technical LUTs in Premiere Pro through the Input LUT option and reserve the Creative section for stylistic looks. Keeping those steps separate makes it easier to troubleshoot issues later.

Build a small collection of favourites

After a while, you’ll probably notice yourself returning to the same LUTs again and again.

There’s nothing wrong with that. Once you’ve found a few looks that works well for your projects, you can use them again and again.

Conclusion

One of the reasons LUTs remain popular is that they can dramatically speed up the grading process without needing you to build every look from scratch. Not every project needs an elaborate colour grading process. Sometimes a simple LUT and a few small adjustments are enough to get the image where it needs to be.

That’s where previewing LUTs can be useful. Rather than downloading large packs and hoping something works, check out the Envato LUTs marketplace makes it easier to compare different looks before adding them to your workflow.

How to import LUTs in Premiere Pro FAQs

Do I need a different LUT for LOG footage?
Usually, yes. Many camera manufacturers provide LUTs specifically for their LOG formats, and third-party creators often do the same.

Can I use more than one LUT on the same clip?
You can, although it isn’t always necessary. If the image starts looking over-processed, try reducing the LUT intensity before adding another one.

Should I use a LUT on every project?
Not necessarily. Some projects benefit from them, while others may only need a few manual colour adjustments.

Where are LUTs stored in Premiere Pro?
Anywhere you like, really. Premiere Pro lets you browse directly to the LUT file, so there’s no requirement to keep everything in a specific folder.

Can I use DaVinci Resolve LUTs in Premiere?
Usually, yes. Most editors move .cube LUTs between applications without any issues.

Why is my footage too dark after applying a LUT?
The first thing I’d check is the LUT itself. A LUT that works perfectly with one type of footage can produce some fairly dramatic results when used on another.

How to Import LUTs in Premiere Pro (Full Guide)

Learn how to import LUTs in Premiere Pro via the Lumetri Color panel, plus how to apply, adjust, and save your favourite looks.