
Envato: Get every type of asset for any type of project, and access to AI tools. Start now

How to import LUTs in After Effects

A step-by-step guide to importing LUTs in After Effects through the Lumetri Color effect, covering technical vs creative LUTs, motion graphics use cases, and common grading mistakes to avoid.

Jonathan Lam 9min read
A person in sunglasses and a dark jacket, mid-stride, with text overlays 'How to import LUTS in After Effects' and the After Effects logo. The background is a collage of sky, cityscape, and colorful graphs.

If your footage, graphics, and effects are already sitting inside an After Effects composition, there’s usually little reason to send everything somewhere else just to apply LUTs in After Effects.

After Effects can use the same LUT files as many popular editing applications. The challenge is usually knowing where Adobe has hidden the controls.

This guide walks through the setup step by step, along with a few tips for using LUTs in motion graphics and compositing projects. We’ll also look at Envato’s new LUTs category, which lets you preview LUTs before downloading them and even test them against your own footage.

TL;DR

After Effects can load LUTs through the Lumetri Color After Effects, allowing you to apply the same .cube files used in Premiere Pro, DaVinci Resolve, and other editing applications.

This tutorial covers the full process, teaching how to install LUTs in After Effects, along with tips for adjusting LUTs, building reusable setups, and avoiding common mistakes.

How do you import LUTs in After Effects?

  1. Download a LUT and locate the .cube file.
  2. Import your footage or create a composition.
  3. Apply LUTs in After Effects using the Lumetri Color effect.
  4. Select the layer or adjustment layer.
  5. Load the LUT using the Input LUT option.

What are LUTs in After Effects?

If you’ve ever applied a filter to a photo, the basic idea behind a LUT isn’t too different. LUTs (Look-Up Tables) are files that change the colours in your footage according to a predefined set of instructions. Editors use them to create a particular look or to convert footage from one colour space to another.

There are two types of LUTs that you need to understand:

Technical LUTs

Technical LUTs are used as part of a colour management workflow. Their job is to transform footage between different image formats or display standards.

They are often used with log recording formats, including Sony S-Log and Canon Log (C-Log). One common use is converting log footage into Rec. 709 for standard viewing and editing workflows.

Technical LUTs are typically applied near the start of the editing process, before any creative colour work begins.

Creative LUTs

Creative LUTs are applied after the main correction process to alter the image’s appearance.

Different creative LUTs can shift color response, contrast, and tonal balance to produce different visual styles. Many downloadable LUT packs, such as those available from Envato, are intended for this stage of the workflow.

Unlimited Creative Assets. Access to AI Tools.

Advanced Cinematic LUTs for Wedding Videographers: 30 Must-Have Presets

aaapresets
Advanced Cinematic LUTs for Wedding Videographers: 30 Must-Have Presets

Traveller LUTs for Final Cut

Playground_Studio
Traveller LUTs for Final Cut

Art Film LUTs

Playground_Studio
Art Film LUTs

Moody Travel LUTs

Playground_Studio
Moody Travel LUTs

Sunset LUTs

Playground_Studio
Sunset LUTs

Film Emulation LUTs for Final Cut

Playground_Studio
Film Emulation LUTs for Final Cut

When to Use LUTs in Motion Design

Imagine a composition containing camera footage, motion graphics, and a few visual effects layers. Each asset may have been created separately, which can make them feel slightly disconnected once they’re brought together.

Some common use cases include:

  • Matching motion graphics to live-action footage.
  • Applying a consistent look across a campaign.
  • Previewing how graphics will appear after final color grading motion graphics.
  • Creating a recognizable visual style for brand content.
  • Speeding up repetitive grading tasks.

It’s common to apply a LUT first and then make smaller adjustments afterwards, rather than building the entire look from scratch.

Where to find LUTs for your project

Finding LUTs is one thing. Finding the right LUT for your footage can be even more difficult. Which is why Envato’s LUTs marketplace comes with thousands of easily searchable LUTs.

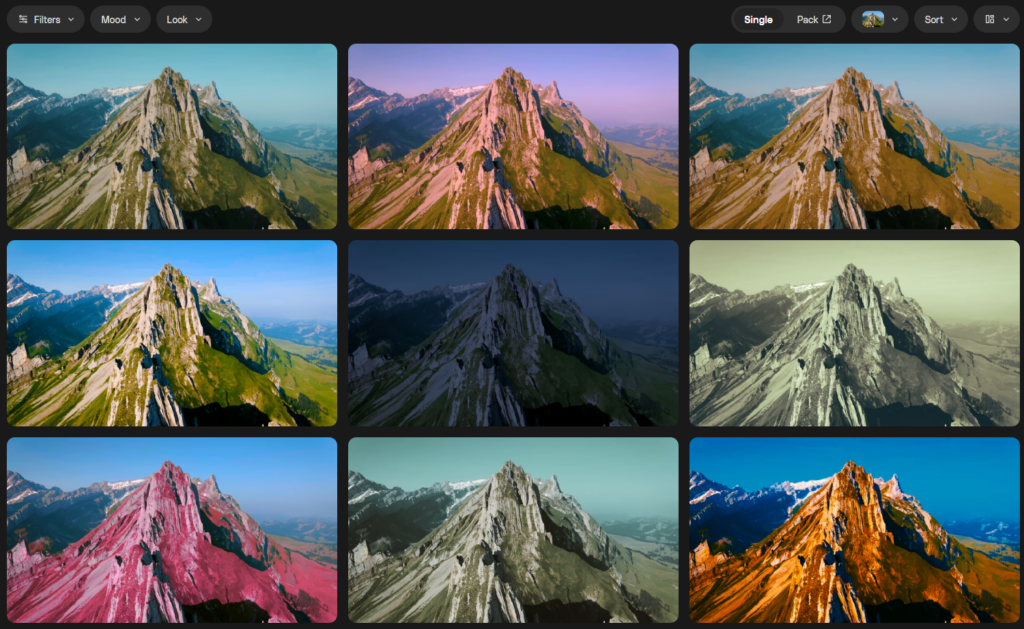
Each LUT has its own page, complete with preview videos that show before-and-after results. You can also upload your own frame to see how a LUT might look on your footage before downloading it.

LUTs are supplied with commercial licensing and can be used across a range of editing and colour grading applications, including Adobe Premiere Pro, DaVinci Resolve, After Effects, CapCut, Final Cut Pro, and many other popular tools. You can also upload your own frame to see how a LUT might look on your footage before downloading it.

Step 1: Download a LUT

Before importing a LUT into After Effects, you’ll need a compatible LUT file.

  1. Visit the Envato LUTs marketplace and browse the available LUTs.
  2. Choose a LUT that suits your footage and download it.
  3. Extract the download if required and locate the .cube file.

Tip: If you’re browsing multiple LUTs, preview them on Envato before downloading. This can save time later when testing different looks against your footage.

Once you have your .cube file ready, open up Adobe After Effects and move on to the next step.

A grid of nine identical mountain landscape photos, each with a different color filter applied, demonstrating various visual moods and styles.
Exploring diverse moods and aesthetics with various color filters applied to a stunning mountain landscape.

Step 2: Import Footage or Create a Composition

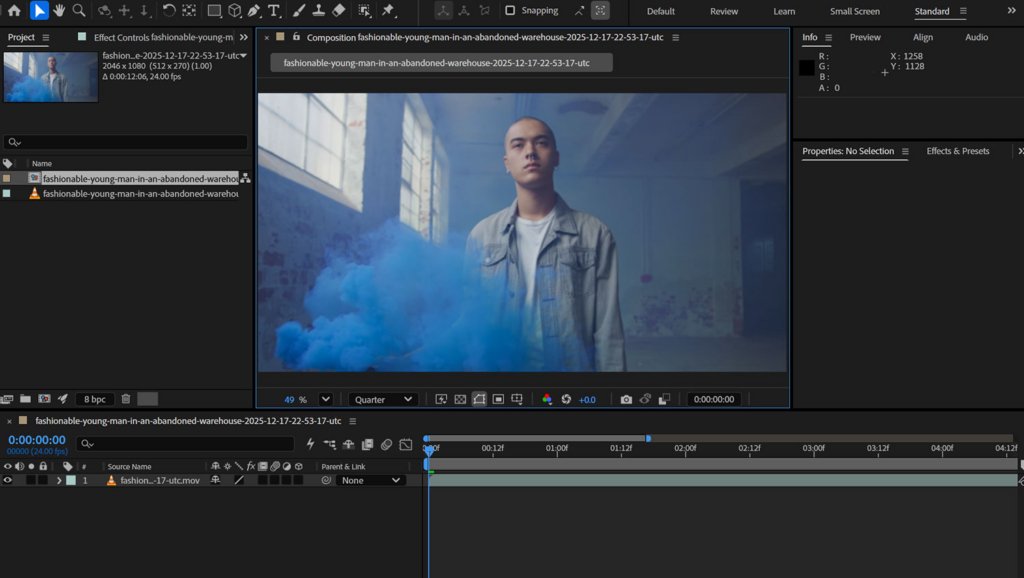
Import your footage and create a composition as you normally would.

Before adding a LUT, it’s usually worth getting the main elements of the shot in place first. That might include footage, graphics, text, effects, or pre-compositions.

Screen capture of video editing software showing a young man in a denim jacket and blue smoke in an abandoned warehouse.
A young man in a denim jacket stands amidst a cloud of blue smoke in an abandoned warehouse, captured within a video editing interface.

Step 3: Add Lumetri Color After Effects

With your composition ready, it’s time to add the effect that handles LUTs in After Effects:

  1. Open the Effects & Presets panel.
  2. Search for Lumetri Color.
  3. Drag the effect onto your footage layer or adjustment layer.

Once the effect has been applied, open the Effect Controls panel. You should now see the Lumetri Color settings, including the Input LUT option that we’ll use in the next step.

If you’re applying the LUT to an adjustment layer, everything underneath that layer will be affected by the grade.

A screenshot of a video editing interface showing a person in a denim jacket surrounded by blue smoke, with the 'Lumetri Color' effect highlighted in the effects panel.
Applying the Lumetri Color effect in video editing software to a scene featuring a person engulfed in blue smoke.

Step 4: Load the LUT

Now for the part you’ve been working towards. Inside the Lumetri Color After Effects controls:

  1. Find the Basic Correction section.
  2. Locate Input LUT.
  3. Click the Browse button.
  4. Navigate to the LUT file you downloaded. Select the file and click Open.

As soon as the LUT loads, you’ll see the change in the Composition panel.

Don’t worry if the result doesn’t look quite right straight away. Many LUTs are designed as a starting point rather than a finished grade, especially if they’re being applied to different footage than they were originally created for.

We’ll make some adjustments in the next step.

Screenshot of video editing software showing color correction settings and a preview of a young man in an abandoned warehouse surrounded by purple smoke.
A video editing interface showing Lumetri Color settings applied to a frame of a young man in an abandoned warehouse with purple smoke, using a ‘crimson-foliage-retro-film-2’ LUT.

Step 5: Adjustments

After loading the LUT, spend a moment looking at the result before making any changes. Sometimes a LUT will look great straight away. Other times the image may appear too dark, too bright, too saturated, or simply different from what you had in mind.

If you’d like to fine-tune the look, try adjusting a few of the controls inside Lumetri Color:

  • Exposure – Brightens or darkens the image.
  • Contrast – Increases or reduces the difference between light and dark areas.
  • Highlights – Recovers detail in bright areas.
  • Shadows – Adjusts darker parts of the image.
  • Saturation – Controls colour intensity.

Small adjustments usually go a long way. If you find yourself making large corrections, it may be worth trying a different LUT and comparing the results.

Screenshot of a video editing software showing a young man in purple smoke and the Lumetri Color basic correction panel with specific color and light adjustments.
A young man is captured amidst vibrant purple smoke in an abandoned warehouse, with the Lumetri Color grading motion graphics settings visible in the editing software interface.

Step 6: Save Reusable Grading Setups

Not every project needs a different look.

If the same LUT appears across multiple projects, keeping a template version of the setup can make sense. To do this, you can just save the base project as a template. The adjustment layer, Lumetri Color effect, and LUT are already in place when the project opens.

Some teams keep separate project files for different looks and grades, pulling them into new projects whenever they’re needed.

Common Mistakes

Most LUT problems aren’t caused by Adobe After Effects. They’re usually caused by applying the wrong LUT, applying it at the wrong stage, or simply expecting too much from it.

Applying LUTs Too Early in the Pipeline

Applying a LUT before major compositing or exposure adjustments can make it harder to evaluate yourwork accurately.

Many artists leave LUT application until later in the process so that creative grading decisions are basedon a more complete image.

Ignoring Color Management

Color management settings can influence how LUTs appear. If colors look unexpected, check your working color space, imported footage settings, and project color management options before assuming the LUT is at fault.

Over-Stylizing Graphics

It’s easy to get carried away with a dramatic grade.

What looked good on a single frame can feel very different once the animation is playing. Text may stand out less, colours can become harder to distinguish, and graphic elements may not feel as clean as they did before the LUT was applied.

Pro Tips

Use Adjustment Layers

Some editors place LUTs on adjustment layers rather than footage layers. It keeps the grade separate from the underlying clips and makes it easier to see exactly where the colour changes are coming from.

Create Template Projects

If you frequently produce similar content, create project templates that already contain your preferred grading setup. This can save time and help maintain consistency across future work.

Maintain Consistency Across Deliverables

Many projects end up being delivered in multiple formats. Keeping the same LUT and grading approach across each version can help maintain a consistent look throughout the wider project.

Conclusion

Awesome! You now know where LUTs live in After Effects and how to load them through Lumetri Color.

The bigger challenge is usually deciding which LUT to use. Envato’s LUTs marketplace was built around that problem, with searchable LUTs, preview videos, and the option to test LUTs against your own footage before downloading.

How to Import LUTs in After Effects FAQs

Does After Effects Support .cube LUTs?
It does. In fact, .cube is probably the format you’ll come across most often when downloading LUTs. After Effects load these files through Lumetri Color using the Input LUT option.

Can I Share LUTs Between Premiere Pro and After Effects?
In most cases, yes. If a LUT works in Premiere Pro, there’s a good chance it will work in After Effects as well because they both support standard LUT formats such as .cube files.

Should LUTs Be Applied Before or After Effects?
There’s no single rule here, but many people leave LUTs until later in the process. It’s often easier to judge compositing, keying, and other visual effects work before a colour grade has been added on top.

Related Posts

Learn how to import LUTs in After Effects using the Lumetri Color effect, from loading your first LUT to fixing common mistakes.