How to edit with AI using Envato stock photos
Learn how to edit with AI on Envato stock photos, customizing images instantly by removing objects, changing backgrounds, and creating polished visuals without leaving the platform.
Envato: Get every type of asset for any type of project, and access to AI tools. Start now
This tutorial explains how to use ImageEdit’s Upscale tool to enhance image resolution through AI upscaling. You’ll learn how to enlarge visuals by 2x or 4x while maintaining sharpness, texture, and natural tone.

Every creative has encountered it: a great photo that’s just too small. Perhaps it’s an older image you want to reuse, a cropped shot that needs to be enlarged, or a web graphic that appears pixelated when printed. Traditional resizing tools simply stretch pixels, creating blur, noise, and detail loss.
That’s where AI image upscaling changes the game.
With Envato’s AI image upscaler, ImageEdit’s Upscale tool, you can enlarge your image by 2x or 4x while preserving — and even improving — sharpness, texture, and overall quality. The AI intelligently reconstructs details, smooths edges, and enhances definition, delivering professional-looking results in seconds.
Whether you’re a photographer preparing large prints or a designer repurposing visuals for new layouts, this feature provides the easiest way to get crisp, high-quality images without complex editing. It’s also available via our “Edit with AI” feature on Envato stock images.
An AI image upscaler enhances image resolution without loss of quality. With ImageEdit’s Upscale feature, you can:
Result: a cleaner, more detailed image that looks as natural as the original.
ImageEdit is Envato’s AI-powered photo editing tool designed to help creators make fast, professional-quality image adjustments without complex software. It combines automation with precision controls, making it suitable for e-commerce, social media, marketing, and design workflows. Here are ImageEdit’s key features:
Together, these features create a streamlined workflow for producing clean, commercial-ready visuals quickly and confidently.
Before you jump into the steps, it’s worth knowing what a good AI image upscaler actually does. Upscaling isn’t just “making it bigger”; it uses machine learning to rebuild detail, sharpen edges, and improve texture so your image can hold up at higher resolutions for print, presentations, and crisp social exports.
In this step-by-step tutorial, you’ll learn how to upscale images with an AI image upscaler in a way that preserves realism and avoids common issues like halos, plastic-looking skin, or crunchy noise.
Start by opening ImageEdit and uploading your image. You can drag and drop your file directly into the editor or use the Upload button in the toolbar.
Supported formats: JPG and PNG.
Use the highest-quality version available. AI performs best with clean, detailed input — the better your source, the sharper your upscale result.
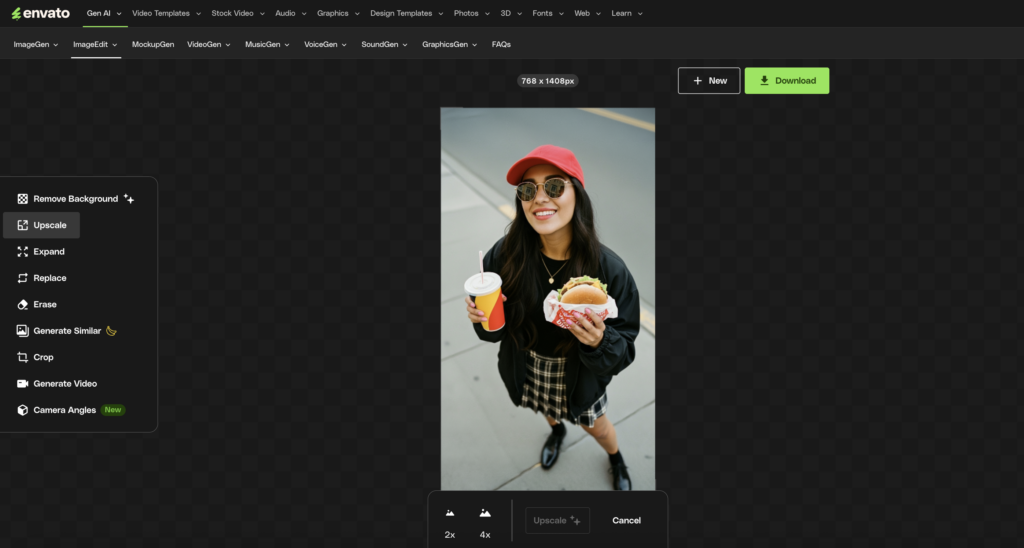
Once your image appears in the workspace, select Upscale in ImageEdit’s AI image upscaler from the right-hand sidebar. This opens the AI upscaling panel, where you’ll see two options:
The interface is clean and straightforward; simply choose the scale that fits your project.

After selecting the desired scale, click Upscale. The AI automatically analyzes your image, reconstructing detail and texture to maintain sharpness even after enlargement.
Instead of duplicating pixels, the AI image model predicts and recreates the finer details, such as edges, shadows, and highlights, that should appear. The process only takes a few seconds.
How it works: ImageEdit’s algorithm uses deep learning to restore detail during enlargement, preserving realism and avoiding common resizing artifacts such as blurring or jagged edges.

Once processing is complete, ImageEdit will display your enhanced image. Zoom in to inspect edges, fine lines, and textures — notice how the AI has refined details without distorting color or contrast.
Check facial features, fabric, or typography for the clearest view of the AI’s improvements.

When you’re satisfied with the result, click Download. Your new, high-quality version will be saved automatically as a PNG file — ready for use in print layouts, marketing materials, or digital projects.
Before you upscale any image, it helps to understand how an AI image upscaler actually enhances detail rather than simply stretching pixels. When used correctly, it can recover texture, sharpen edges, and prepare visuals for print or high-resolution displays without introducing noise or artifacts. In the tips below, you’ll learn how to get the cleanest, most realistic results from your AI image upscaler workflow.
As image quality expectations rise across print, web, and social platforms, resolution matters more than ever. An AI image upscaler gives you a smarter way to enlarge visuals without sacrificing sharpness or texture. Instead of simply stretching pixels, it intelligently rebuilds detail, making it ideal for product photos, portfolio work, and high-resolution marketing assets.
AI upscaling increases the resolution of your image by 2x or 4x, reconstructing details and textures for a sharper, more natural look.
You can upload and enhance JPG or PNG images, and ImageEdit automatically exports the result as a high-quality PNG.
No — the process preserves your original colors and lighting, only improving texture and definition.
2x doubles your image size with minimal processing time, while 4x quadruples it for maximum detail. Both maintain excellent clarity.
Photographers, designers, and content creators who need to reuse smaller images in higher-resolution projects — without losing quality.
With ImageEdit’s AI upscaling, you can transform undersized or low-resolution images into crisp, detailed visuals in just one click. The combination of intelligent enhancement and simplicity makes it an essential tool for anyone working with photos, videos, or design assets.
Whether you’re restoring an old image or preparing a photo for print, the Upscale feature ensures your visuals always look sharp, professional, and ready to impress.
From small to spectacular — AI takes care of the hard work.
Learn how to edit with AI on Envato stock photos, customizing images instantly by removing objects, changing backgrounds, and creating polished visuals without leaving the platform.

Explore the tennis aesthetic trend for 2026, from preppy style and color palettes to branding and design ideas inspired by tennis culture, fashion, and modern creative projects.

Fourteen World Cup shirts that still matter, from Brazil 1954 to Cameroon's banned vest. The design thinking behind the kits that lasted, and what they all have in common.

Canary yellow explained: meaning, hex code, color psychology and design ideas. Learn how to use this bold yellow in branding, UI and 2026 creative projects.